
Instruction manual


. .
3 Display 32
Navigating By
Marks
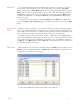
Marks that are placed on the recording can serve as “sign posts,” indicating where important
sections of data are located. Click on the down arrow next to the Mark button and choose the
mark you want to “go-to.” DataTrax2 software will find the data point associated with that mark
and display that section of data in the Main window. In this manner, the user can move between
important areas of an experiment without hunting or scrolling for the areas of interest.
Positioning Mark
Comments
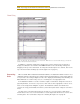
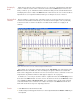
On presentations or printed copies of the data record, it is useful to position the text of the
comment associated with a mark directly over the data to which it applies. This is particularly
useful if more than one channel of data was recorded and the mark does not apply to all
channels.
Figure 3-14: Comments moved on to the channel data display in the Main window.
When marks are created, the comments appear in the Text Display area at the bottom of the
Main window above the Time axis. After recording has stopped, comments associated with
marks can be dragged into the data area of the record. The text of these comments can be read
and printed in any window in which the data appears (Figure 3-14 on page 32).
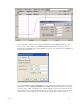
Sometimes, it is necessary to return the marks in a particular view to the Text Display area at
the bottom of the Main window. To do this, click on the down arrow next to the Mark button and
choose Reset Location of displayed marks. This command returns only the mark comments
on the data window of the current screen of data to the bottom of the Main window. All other
marks will remain where they were originally positioned.
Exercise 1 Click Start and record a few minutes of data.
2 As data is being recorded, type the word “Test 1” on the keyboard and strike the Return or Enter key on
the keyboard.