
Instruction manual


3 Display 31
Preset Marks If you know the marks that you will be adding to the record prior to recording, you can store
the mark text as preset marks. To create a preset mark, type in the mark text in the Mark
window, and choose the Add to Mark Presets option by clicking on the down arrow next to the
Mark button. This will save the typed text as a preset mark, which can be called by clicking on
the Mark drop-down box and choosing the desired preset mark. This loads the Mark window
with the desired mark text, now clicking the Mark button or hitting Return will add the preset
mark to the record.
You can delete a preset mark by selecting Preset Mark from the Mark drop-down box and
choosing the Delete from mark presets option by clicking on the down arrow next to the Mark
button.
Making Marks
Off-Line
Marking events as they happen is a necessity for events that are time critical, like drug deliv-
eries or experimental interventions. Information about the experiment that is important, but not
time critical, can be marked on the recording after the recording is completed. An example of the
type of comment to be added to the record would be a change in room temperature.
To add this information to the record after recording is completed, select the Single Cursor
mode from the DataTrax2 toolbar. Position the single cursor bar on the record where the mark is
to be positioned. Type the text (a maximum of 50 characters), associated with the new mark, on
the Mark line in the Main window. Click the Mark button and the mark and its text comment are
inserted at the position of the cursor.
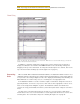
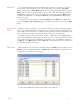
Editing Marks Marks already on the record can be changed by going to the Marks window, available from the
Window menu or the DataTrax2 toolbar. The Marks window is a dialog box containing a list of
all marks in a record (Figure 3-13 on page 31).
Figure 3-13: The DataTrax2 Marks window.
To edit a mark, highlight the mark, by clicking twice on the mark text.