
Instruction manual


. .
3 Display 30
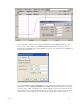
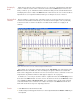
Units can also be set from the Channel page of the Preferences dialog window. Each channel
can be set with the conversion factors provided by the transducer manufacturer (see the section
on Preferences in this manual).
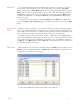
All of the recorded data, acquired by the hardware as raw data, are displayed as voltages.
From time-to-time, it may be desirable to turn off the Units Conversion and simply view the raw
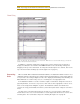
data. To view raw data, open the Units Conversion dialog window (Figure 3-10 on page 28).
Notice that the program reports the current values in voltage at each cursor and the represen-
tative converted values. Selecting Units Off in this dialog window returns the original display to
Volts as the default unit.
From the Units menu you can also Zero all Blocks, which takes the value between the
cursors and sets that value to zero for all blocks.
From the Units menu, you can also turn off the units for all blocks.
Inverting the
Trace
When recording physical parameters, such as temperature, pressure or force, it is best if the
polarity of the data display matches the real-world behavior of the parameter. For example, if the
observed temperature goes up, the trace on the computer screen should go up. Increasing
pressure or force should also produce a positive or upward deflection of the trace.
Depending how sensors and amplifiers are wired, this may or may not be the case. In the
event that the data display has the wrong sense or polarity, the trace can be inverted by
selecting Invert from the Channel menu, Units menu, or the Right-Click menu of any data
channel. As with Units Conversions, the Invert function can be switched off at any time.
Marks The DataTrax2 software can record large amounts of data, but the data of interest must easily
be located and retrieved to be useful. Also, information needs to be extracted from the data to
make it useful. To locate specific sections of data and to differentiate parts of the record from
one another, it is possible to put Marks on the data while DataTrax2 is recording. Marks are one
of three navigation tools provided by the DataTrax2 software. In addition to being made on-line,
Marks can be inserted and edited after the recording has stopped.
Making Marks
On-Line
Marks (and their associated comments) can be placed on the recording without interrupting
the flow of data to the computer.
As soon as the Start button is clicked and data recording begins, the DataTrax2 program sets
an active text cursor on the Mark line, next to the Mark button on the Main window. On the Mark
line, the user can type a comment describing an upcoming step in the experiment. The comment
will be associated with the next mark that is placed on the recording.
The mark is placed on the recording when the Enter (or Return) key on the keyboard is
pressed, or the Mark button on the Main window is clicked. The mark will be signified by a
vertical black line that is inserted on the data at the moment the Enter key is pressed or the
Mark button is clicked. When recording is halted, the typed comment that was loaded on the
Mark line prior to the event can be seen in the Text Display area at the bottom of the screen.
A mark is time-locked to the record at the moment the Return or Enter key is pressed. An
unlimited number of marks can be attached to the record. The vertical line on the recording that
is associated with a mark is provided as visual confirmation that the mark has been placed.