
Instruction manual


3 Display 29
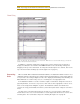
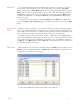
Cursors 1 and 2. Enter the corresponding values in real units into the two value boxes on the
right. In the Name area, enter the name of the unit to be displayed on the Y-axis. If a unit name
is not entered, Volts will be used as a default name.
Figure 3-11: The Units Conversion dialog window showing slope and offset boxes.
It is also possible to set the slope and offset directly, if those values are known (Figure 3-11
on page 29). For example, if a pressure transducer produces 5mV (0.005V) per mmHg, the
slope would be 0.005 and the units would be mmHg. To use slope in a units conversion, the
slope must be expressed as Volts/unit. Ideally, when a sensor puts out zero volts, the value of
the converted units would also be zero. For many sensors this is true. However, there are many
sensors that can have their offset changed by ambient conditions, such as changing barometric
pressure. To correct for sensor offset, determine the value (in converted units) that DataTrax2
reports on the screen when the sensor should be reading zero. Enter this value in the offset
area of the Units Conversion dialog window.
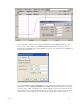
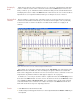
Figure 3-12: The Units Conversion dialog window showing offset only boxes.
Sometimes, it is necessary to keep the units conversion relationship and change the offset,
like turning the offset control on an amplifier. For example, if we want to set a particular region
to zero, set the two cursors around the desired region of data. Select Units from the Right-Click
menu. Choose Offset Only from the drop-down menu (Figure 3-12 on page 29). The average
value between the two cursors can now be set to the required offset value (zero, in this
example).
The units are always applied to the selected block(s). To apply the units to all blocks, select
the Apply units to all blocks checkbox. To apply units to new data which will be recorded select
the Apply units to new data checkbox.