
Instruction manual

2 Acquisition 11
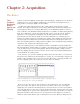
connected by a line, a sine wave with a frequency of 0.1Hz is displayed on the screen. Again,
the wave displayed on the screen is not a true representation of the real wave because the
sampling speed is too slow.
So, how fast does the sampling speed need to be to record a reasonable representation of a
real waveform? A general rule of thumb is to sample at a rate that is a minimum of five times
faster than the fastest frequency of interest in the waveform.
To determine the optimal sampling frequency, find the shortest event in a sample recording.
For example, the R wave has the shortest duration of any event in the ECG and should be used
to determine the sampling speed needed to record a reasonable representation of the ECG.
Next, find the rise time (in seconds) of the R wave. The rise time is the time it takes the wave of
interest to go from its start to about 2/3 of full value. In the case of the R wave in an ECG, this
value is about 20 milliseconds (0.020 seconds).
Substitute the value 0.02 for the rise time in the following equation to determine the bandwidth
of the event (R wave):
0.159/Rise Time = Bandwidth
0.159/0.020 = 8
Finally, multiply the bandwidth by five to determine the minimum sampling frequency needed,
which is 40Hz in this example. Higher sampling rates give better pictures, at the expense of
making data files larger. Therefore, choosing a proper sampling speed must be a balance
between the accurate portrayal of the data and the unwieldy size of the data file.
The default sampling speed set in the DataTrax2 software is 200 samples per second. This is
adequate to execute most of the laboratory experiments presented in the laboratory manuals
furnished with the WPI teaching kits.
If sampling speeds are set manually, it is always best to
start sampling the data at the fastest speed possible.
Then, slowly reduce the sampling rate to a speed where
data initially begins to degrade. Finally, set the sampling
speed just above the rate that initially cause degra-
dation. See the examples of pulse waves sampled at
different frequencies in the appendix.
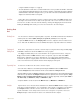
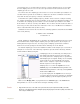
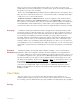
Sampling rates are set from the Speed menu on the
Channels page of the Preferences dialog window. The
Preferences dialog window is called by selecting Prefer-
ences from the Edit menu.
The speeds displayed in the Speed menu are rates per
second per channel. This menu is dynamic, the maximum
available sampling speed will adjust depending on how
many channels are open.
Make sure the Display Time, as programmed on the Channels page of the Preferences
dialog window, is set to 10 seconds before doing the following exercise.
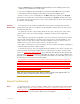
Exercise 1 Plug the DIN connector on the cable of the pulse transducer (PT-104) furnished with your kit into
Channel 3 on the WPI/214 interface. Wrap the plethysmograph (pulse transducer) firmly around the end
of the subject’s middle finger.