
Instruction manual

1 Quick Start 7
Channel Mode Clicking on Channel Mode in Raw Data displays the input option available for a given
channel. On a computed channel, clicking on Channel Mode allows you to set up an existing
function or to change and set up a new function on that channel.
The Channel
Menu
From the channel menu, some of the parameters also controlled in the Preferences dialog
pages, can be set. These include Units, Scale and Title.
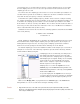
Add Function Raw data can be transformed by computed functions and displayed as values which provide a
a clearer interpretation of the data. For example, periodic data, like that of an ECG, can be
transformed by the Rate function to a plot of the subject’s heart rate (BPM). Some of the
functions available include: Frequency, Period, Integral, Derivative, Channel Math,
Spirometry Volumes, and EEG Power Spectrum. Clicking on a Raw Data Channel’s Add
Function button displays a menu of available functions. Selecting one creates a new channel to
display the function data.
Saving Data Data recorded in a file can be saved, closed and opened from any computer at a later time for
analysis.
To save the recorded data in a file, select Save As in the File menu. Name the file in the file
name box. Choose a destination on the computer in which to save the file (e.g. the WPI or class
folder). Click the Save button to save the file as an *.iwxdata file.
Navigating
Data
Once recorded, data is “navigated” in a few ways:
Analysis Window An area of the data can be selected for viewing and measuring in the Analysis window.
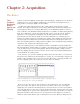
1 Use the screen time controls (Half or Double Display Time) to provide a better view of recorded
events. Click on the Double Display Time button (little mountain in the toolbar, Figure 1-1 on page 5)
until all of the data is visible in a single screen.
2 Once the data of interest is displayed in the Main Window, click the Analysis Window icon and the data
is displayed in the Analysis Window.
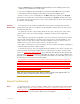
Marks Marks can also be used to navigate data. A Mark is a text annotation made while recording or
after recording, that is locked to the data at a certain point in time.
1 To mark the record while you are recording, use the keyboard to type a message on the Marks line.
Pressing Return or Enter on the keyboard will enter the text mark on the recording at that time.
2 When reviewing data, you can move directly to a mark from anywhere in the data using the Marks
window. To open the Marks window, click on the Marks button in the toolbar or select Marks from the
Window menu of DataTrax2. Select the mark of interest. Click the GoTo button to move directly to the
area of data that contains the mark. Another way to navigate to a Mark is to click on the down arrow
next to the Mark button and select the Mark of interest.
3 Marks can be entered after data recording is complete using the Single Cursor button (the button with