
Instruction manual

1 Quick Start 5
Chapter 1: Quick Start
Start here if you are already familiar with data recording concepts. This chapter contains all
you need to know to begin recording data quickly and easily.
Managing Signals
The management of recorded data is divided into three steps:
1 Recording data onto the computer,
2 Navigating the recorded data to find particular areas of interest, and
3 Outputting the data either in printed or analyzed form.
Recording
Data
Recording data is the most basic of the three steps. It is also the only one that is time critical.
That is, you must record data when it happens, whereas navigating, analyzing or printing data
can occur anytime after the data has been recorded. The following section explains the basic
concepts and controls required to record data using the DataTrax2 software.
Start Recording The most basic control in the DataTrax2 software is the one that starts and stops the
recording. This control is found in the upper right hand corner of the Main window. After
ensuring that the source of your signal is properly connected to your data acquisition device,
click the Record button to begin recording. While data is being recorded the Record button will
change to a Stop button. Click Stop at any time to end data recording.
Displaying Data The events you want to record using the DataTrax2 software may be very slow, like the
discharge curve of a 9-Volt battery, which can take hours; or very fast, like the QRS complex in
a human electrocardiogram, which may take only a fraction of a second. DataTrax2 software
allows you to record both slow and fast events, while displaying the recorded results in a format
that is easily interpreted. To manage the temporal display of your data in the DataTrax2
software, a parameter called display time is used.
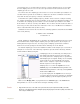
1 Display time is simply the amount of time represented by one full screen of data that you see on the
monitor. When the program opens, the default display time is set to 10 seconds. You can change the
display time by using the Half Display Time, Zoom Between Cursors or Double Display Time
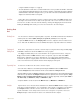
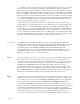
controls in the toolbar (Figure 1-1 on page 5).
Figure 1-1: The Display Time icons on the DataTrax2 Main window toolbar.
• Clicking the Half Display Time button (big mountain) “halves” the screen time. So, a 10-second, full-
screen display becomes a five-second, full-screen display, effectively doubling the display resolution.
• Clicking the Zoom Between Cursors button fills the display window with the data located between the
cursors.