
Instruction manual


SI-H Muscle Testers
32
WORLD PRECISION IN STRU MENTS
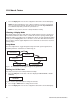
Setting the Camera (CCD) Mode
1. Press the Setup button until “ CCD Mode" displays. Two options are available:
• If you set the system to 263Hz (default), the full display of the CCD is used and
the camera operates at 263Hz.
• For faster operations (1KHz), set the system to 1KHz. At the faster speed, only the
fi rst quarter of the CCD camera display is used for making measurements.
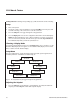
CCD Mode
263 Hz
Fig. 30 Press the Up or Down button to change the CCD mode.
NOTE: The update rate is only supported on the analog outputs. The LCD display update
rate is much slower.
2. Press the Up or Down button to change the CCD mode.
3. Press the Display button to save the confi guration and return to the normal display.
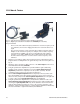
Aligning the Laser and the Camera
WARNING: DO NOT EXPOSE YOUR EYES TO LASER LIGHT. EVEN REFLECTED
LASER LIGHT MAY BE HARMFUL. ALWAYS WEAR PROTECTIVE LENSES WHEN
WORKING WITH LASERS.
1. Turn on the system. See "Turning the System On" on page 24.
2. Enable the laser. By default, the laser is always disabled on startup. See "Turning On/
Off the Laser" on page 30. When the laser is enabled, a red dot (the laser beam)
appears near the cross hair mark on the front of the camera.
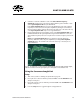
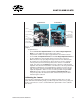
3. The laser beam (center beam) must hit the cross hair mark on the CCD camera front
plate.
Fig. 31 The cross hair mark is etched on the front of the camera, which is mounted just behind
the optical cuvette.