Sierra Pin Assembly Instructions for 2 and 3-leg Workcenters #1500130 - Rev B
Sierra Pin Workcenters - Assembly Instructions for 2 and 3-leg Tables List of Parts, grouped by carton A Top (size and shape differ for each model) Qty: 1 There are two Side Leg cartons for each workcenter.
Sierra Pin Workcenters - Assembly Instructions for 2 and 3-leg Tables 1 Verify that you have all the hardware and tools needed for the assembly Check your cartons against the list on page 2 to verify that you have all the parts needed.
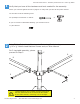
Sierra Pin Workcenters - Assembly Instructions for 2 and 3-leg Tables 3 Attach Crossbars to Side Legs using ¼-20 x ⅝" Button head Machine Screws B B 3-Leg Tables D E E D F To avoid stripping the threads, always insert and make the first few turns of the screw BY HAND with an Allen wrench, ensuring it is in straight.
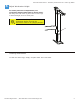
Sierra Pin Workcenters - Assembly Instructions for 2 and 3-leg Tables 5 Adjust Workcenter Height For safety and ease of adjustment, set workcenter height while table is upside down. Pull Ring Pins from each leg and raise or lower legs to desired height, then re-insert pins. Be sure to check legs for even adjustment before turning the workcenter back to its upright position. H Cleaning instructions To clean the Sierra legs, simply use plain water and a soft cloth. Workrite Ergonomics | 800.959.
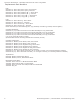
Sierra Pin Workcenters - Assembly Instructions for 2 and 3-leg Tables Replacement Part Numbers Feet: 6400341-01: 6400341-02: 6400339-01: 6400339-02: 6400337-01: 6400337-02: Sierra Sierra Sierra Sierra Sierra Sierra Foot, Foot, Foot, Foot, Foot, Foot, Short (5⅜"), Sierra Silver Short (5⅜"), Charcoal Medium (7⅞"), Sierra Silver Medium (7⅞"), Charcoal Long (14¾"), Sierra Silver Long (14¾"), Charcoal Legs: 6400413-01: Sierra End Leg - Sierra Silver 6400413-02: Sierra End Leg – Charcoal 6400414-01: Sierra C