Workrite Sierra HXL™ Assembly Instructions for 3-Leg Front-Crank Workcenters #1500197 - Rev A
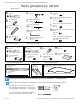
Workrite Sierra HXL™ 3-Leg Crank Workcenters - Assembly Instructions Main carton: A Parts grouped by carton E Leg, Type I* Qty: 1 J Crank Handle Assembly Qty: 1 K *part# 6195026-01 B C D Short Bracket Qty: 2 F Shallow Hex Shaft Qty: 2 Medium Bracket Qty: 2 G Deep Hex Shaft Qty: 2 L H 4 mm Allen Wrench Qty: 1 M I Second Leg carton: Leg, Type I* Qty: 1 Top Leg Bracket Qty: 1 Long Component carton: S Long Bracket Qty: 2 T Crank Tube Qty: 2 1 a M6 × 16 mm Flat Head Machine Screw Qty
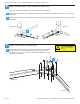
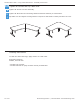
Workrite Sierra HXL™ 3-Leg Crank Workcenters - Assembly Instructions 1 b Verify that you have all the hardware and tools needed for the assembly (cont.) Placement of the legs is very important. Take the time now to lay out the Legs(A), (N) & (P), Top Leg Brackets(D), (O) & (R), Crank Tubes (T), and Brackets (B), (C) & (R) on the floor in the proper location. Note: the right leg will be on your left and vice versa when the assembly is seen from the back.
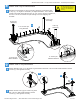
Workrite Sierra HXL™ 3-Leg Crank Workcenters - Assembly Instructions 3 Attach Short and Medium Brackets to Side Legs ! To avoid stripping the threads, always insert and make the first few turns of the screw BY HAND with an Allen wrench H ensuring it is in straight. a Attach both Short Brackets (B) using M6 × 8 mm Button Head Screws (J). Do not tighten screws completely - allow them to slide left and right in Bracket.
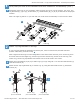
Workrite Sierra HXL™ 3-Leg Crank Workcenters - Assembly Instructions 5 a Attach Center Leg to Hex Shafts and Crank Tubes Lay out the leg assemblies, 4 Hex Shafts (F) & (G), and Crank Tubes (T) in the proper locations for assembly.
Workrite Sierra HXL™ 3-Leg Crank Workcenters - Assembly Instructions 6 Attach Outside Legs to Hex Shafts and Crank Tube With Leg Assemblies upside down and aligned to worksurface... a Right Leg: Insert short end of Deep Hex Shaft (G) into Right Leg. Slide Crank Tube (T) over Deep Hex Shaft. b Left Leg: Insert short end of Shallow Hex Shaft (F) into Left Leg. Slide Crank Tube (T) over Shallow Hex Shaft.
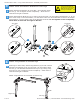
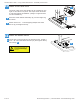
Workrite Sierra HXL™ 3-Leg Crank Workcenters - Assembly Instructions 8 a Attach Side Legs to Worksurface Position leg assembly to align mounting holes to pre-drilled holes in Top (V) - it might be necessary to adjust brackets - then attach loosely using Pan Head Screws (M). If you use an electric screwdriver, be sure it is on the lowest torque setting to avoid stripping the threads. ! If you have a Silhouette ½" top, be sure to use #10 - 24 × ½” Pan Head Self-Tapping Screws or you will damage your top.
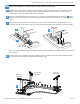
Workrite Sierra HXL™ 3-Leg Crank Workcenters - Assembly Instructions 10 Attach Front Crank Drive b The front crank drive and handle can be installed on the right or left side as required. The steps shown illustrate a right side handle installation (change to opposite side for left installation). a b Place the Crank Handle Assembly (E) into the Right Leg as shown. Attach with #12 × ½” Self Tapping Phillips Pan Head Screw (K) and tighten firmly.
Workrite Sierra HXL™ 3-Leg Crank Workcenters - Assembly Instructions 12 Base-Only Models: Loosely Secure Table Base to Tabletop a Position the leg assembly on the face-down table top. Center the assembly on the table so that neither of the side legs overlap the edge. Measure carefully to ensure that your table will be positioned correctly as detailed below before drilling. b With the Crank Handle pushed all the way in, position the Medium Bracket as shown in b below, based on your table depth.
Workrite Sierra HXL™ 3-Leg Crank Workcenters - Assembly Instructions 13 Tighten All Screws and Flip Table Over a b c Tighten all Screws in frame assembly. Tighten all Wood Screws connecting handle and frame assembly to worksurface. Flip table over and adjust Leveling Glides if required so that table is steady and does not rock. Cleaning instructions To clean the Sierra HXL legs, apply cleaner to a soft cloth.