Workrite Sierra HXL™ Assembly Instructions for 2-Leg Front Crank Workcenters #1500191 - Rev B
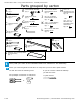
Workrite Sierra HXL™ 2-Leg Crank Workcenters - Assembly Instructions Parts grouped by carton A Leg Qty: 1 E Crank Handle Assembly Qty: 1 I B Short Bracket Qty: 2 F Shallow Hex Shaft Qty: 1 J G Deep Hex Shaft Qty: 1 H 4 mm Allen Wrench Qty: 1 C Medium Bracket Qty: 2 D Top Leg Bracket Qty: 1 N Leg Qty: 1 P Long Bracket Qty: 1 O Top Leg Bracket Qty: 1 Q Crank Tube Qty: 1 S M6 × 12 mm Button Head Machine Screw Qty: 8 M6 × 8 mm Button Head Machine Screw Qty: 12 K L #12 × ½" Self Ta
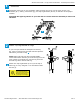
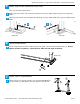
Workrite Sierra HXL™ 2-Leg Crank Workcenters - Assembly Instructions 1 b ...continued Placement of the legs is very important. Take the time now to lay out the Legs (A & N), Leg Brackets (B, C, and P), Crank Tube (Q), and Top Leg Brackets (D & O) on the floor in the proper location. Note that the right leg will be on your left and vice versa when the assembly is seen from the back.
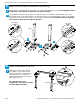
Workrite Sierra HXL™ 2-Leg Crank Workcenters - Assembly Instructions 3 Attach Short and Medium Brackets to Leg Assembly a Attach both Short Brackets (B) using M6 × 8 mm Button Head Screws (J). Do not tighten screws completely - allow them to slide left and right in Bracket. b Attach Medium Brackets (C) to sides of Legs using M6 × 8 mm Button Head Screws (H). If you have a 24" deep or less worksurface, use the holes to the rear of the Bracket as shown.
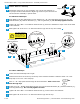
Workrite Sierra HXL™ 2-Leg Crank Workcenters - Assembly Instructions 5 Attach Legs to Hex Shafts and Crank Tube Turn Leg Assembly upside down. a Right Leg: Insert short end of Deep Hex Shaft (G) into leg. Slide Crank Tube (Q) over Deep Hex Shaft. b Left Leg: Insert short end of Shallow Hex Shaft (F) into leg. Slide Crank Tube (Q) over Shallow Hex Shaft. G a Q Q b F Right Leg 6 a Left Leg Secure Long Bracket Attach Long Bracket to back of right Leg Cap using M6 × 8 mm Button Head Screws (J).
Workrite Sierra HXL™ 2-Leg Crank Workcenters - Assembly Instructions 8 a Attach Base to Tabletop Placement of the legs is very important. Lay out the leg assembly in the proper location. Note that the Right Leg will be on your left and vice versa when the assembly is upside down. Left Leg a Right Leg For Workrite Tabletops: b Align Base to the pre-drilled holes in top. Install #12 × ¾" Pan Head Wood Screws (M) into the Short Brackets (B), Medium Brackets (C) , and Long Bracket (P).
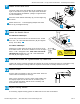
Workrite Sierra HXL™ 2-Leg Crank Workcenters - Assembly Instructions 9 Attach Front Crank Drive b The front crank drive and handle can be installed on the right or left side as required. The steps shown illustrate a right side handle installation (change to opposite side for left installation). a b Place the Crank Handle Assembly (E) into the Right Leg as shown. K E Attach with #12 × ½" Self Tapping Phillips Pan Head Screw (K) and tighten firmly.