
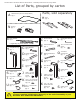
Assembly Instructions for 3-leg Electric Workcenters Owner manual


6 of 8 Workrite Ergonomics | 800.959.9675 www.workriteergo.com
Workrite Sierra HX & HXL Electric Workcenters - Assembly Instructions for 3-leg Tables
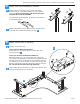
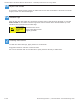
Attach Switch
If you have a Workrite worksurface:
Position the switch over the pilot holes near front
edge of worksurface.
If you do not have a Workrite worksurface:
For non-Workrite worksurfaces, align Switch (N)
sothatoutermostedgeofswitchisushwith
edge of worksurface. Pre-drill screw pilot holes
into underside of worksurface with
3
⁄
32
”drillbit.
You may wish to mark your drill bit so you do not
drillanymorethan¾”deepanddamageyour
worksurface top.
Do not drill all the way through
worksurface!
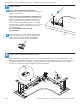
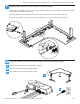
Attach Cable Spools and Cable Loops
Attach Cable Spool (Q) with the #12 × ¾"Pan Head Laminate screw (K) and Cable Loops (S) to
undersideofworksurfaceusing#8×⅝"PanHeadScrew(M)makingsuretowraptheCableLoop
around the cable prior to attaching. If you do NOT have a Workrite worksurface, mount cable
spools in a convenient location between legs and control box.
Attach Switch (N) to underside of worksurface
usingthesmaller(#8×⅝”)PanHeadScrews
(M). You may have purchased the Standard
Control which attaches in the same fashion.
front
N
M
b
7
a
8
b
K
U
S
Q
S
S
M
S
U
K