Workrite Sierra HX™ & HXL™ Assembly Instructions for 3-leg Electric Workcenters #1500216- Rev A
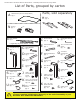
Workrite Sierra HX & HXL Electric Workcenters - Assembly Instructions for 3-leg Tables List of Parts, grouped by carton A Worksurface (size and shape differ) Qty: 1 N Control Qty: 1 B H Parts, sold separately H Feet Qty: 2 or Rear Bracket Qty: 1 C Short Bracket Qty: 4 L * Lengths may vary and be different E Left End Bracket Qty: 1 M Companion Leg Qty: 1 S Cable Loops Qty: 5 T Leg Cable - 2 meter Qty: 2 U Center Foot Qty: 1 C Short Bracket Qty: 1 D Center Bracket Qty: 1 F Right
Workrite Sierra HX & HXL Electric Workcenters - Assembly Instructions for 3-leg Tables 1 a Verify that you have all the hardware and tools needed for the assembly. Check your cartons against the list on page 2 to verify that you have all the parts needed.
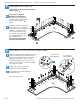
Workrite Sierra HX & HXL Electric Workcenters - Assembly Instructions for 3-leg Tables 3 Locate Base and Pre-drill Top If you have a Workrite worksurface skip to step 4 . a b If you do not have a Workrite worksurface: Position leg assemblies on bottom side of worksurface using measurements a below. Mark placement of mounting holes, then use ⅛” drill bit to drill pilot holes at marked locations.
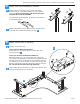
Workrite Sierra HX & HXL Electric Workcenters - Assembly Instructions for 3-leg Tables 5 a Attach Feet (sold separately) & Slides Attach Feet (H) to bottom of legs with Flat Head Cap Screws (J), using Allen Wrench (L) and tighten securely. Be sure the longer end of the foot goes towards the front of the table. I J H H You may have purchased the Styled Feet, that attach in the same fashion. b 6 a Attach Feet Glides (I) to bottom of feet.
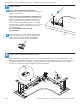
Workrite Sierra HX & HXL Electric Workcenters - Assembly Instructions for 3-leg Tables 7 a Attach Switch If you have a Workrite worksurface: Position the switch over the pilot holes near front edge of worksurface. b M If you do not have a Workrite worksurface: For non-Workrite worksurfaces, align Switch (N) so that outermost edge of switch is flush with edge of worksurface. Pre-drill screw pilot holes into underside of worksurface with 3⁄32” drill bit.
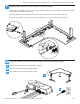
Workrite Sierra HX & HXL Electric Workcenters - Assembly Instructions for 3-leg Tables 9 Connect Leg Cables to Control leg and Companion Leg Connect the Leg Cable (P) to the six position connector labeled ”1” on both the Control Leg, Center Leg and the Companion Leg (G & H). Insert the Switch Cable (N) into the data connector labeled “A1” on the Control Box (O).
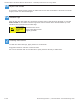
Workrite Sierra HX & HXL Electric Workcenters - Assembly Instructions for 3-leg Tables 11 Adjust Feet Guides If necessary, adjust leveling guides on table feet to level the worksurface. Unscrew to increase height, screw in to decrease height. 12 Initialize Legs After all legs and the switch are connected, and the power cord has been plugged in, hold the down arrow on the switch until the legs make a short motion down and then back up. This initializes and synchronizes the table legs.