
Assembly Instructions for 3-Leg Front-Crank models User guide

Workrite Ergonomics | 800.959.9675 www.workriteergo.com 3
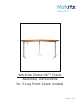
Workrite Sierra HX™ 3-Leg Crank Workcenters - Assembly Instructions
OR
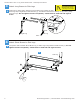
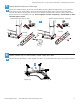
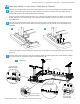
Placementofthelegsisveryimportant.TakethetimenowtolayouttheLegs(E),LegBraces(B,
C,andF),CrankTube(D),andLegCaps(G)ontheoorintheproperlocation.
Note that the right leg will be on your left and vice versa when the assembly is seen from the back.
b
b
Right Leg Left Leg
G
E
F
C
B
D
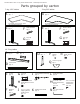
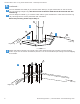
Verify that you have all the hardware and tools needed for the assembly
Check your cartons against the lists on page 2 and 3 to verify that you have all the parts needed.
You will also need the following tools:
#2 tip Phillips screwdriver or drill bit
#3 tip Phillips screwdriver or drill bit
If you do not have a Workrite tabletop, you will also need a:
⅛”pilotdrillbit
1
a
O
2
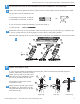
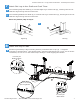
Attach Leg Caps to Legs
If you have purchased the HX Spacer Accessory Kit, refer to instructions provided with that
product. Otherwise, proceed to step a.
Attach one Leg Cap (G) to the top of
eachSideLeg(E)usingButtonHead
Screws (H) and Allen Wrench (N).
See drawing in Step 3 for correct
orientation of legs.
a
G
H
N
E
Right Leg Left Leg
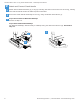
Center Leg
Attach Center Leg Cap (Q) to Center
Leg Spacer (P) and Center Leg (O)
using Flat Pan Head Screws (R) and
Allen Wrench (N).
b
a b
S
OR
P
Q
E
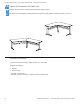
90º 120º