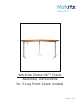
Workrite Sierra HX™ Crank Assembly Instructions for 3-Leg Front-Crank models #1500161 - Rev a
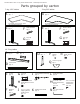
Workrite Sierra HX™ 3-Leg Crank Workcenters - Assembly Instructions Parts grouped by carton 3-leg 120º tables 3-leg 90º tables A A Tabletop (size and shape differ for each model) Qty: 1 For assembly of two-piece tops, please refer to separate instructions. For assembly of two-piece tops, please refer to separate instructions.
Workrite Sierra HX™ 3-Leg Crank Workcenters - Assembly Instructions 1 a Verify that you have all the hardware and tools needed for the assembly Check your cartons against the lists on page 2 and 3 to verify that you have all the parts needed. You will also need the following tools: #2 tip Phillips screwdriver or drill bit #3 tip Phillips screwdriver or drill bit OR If you do not have a Workrite tabletop, you will also need a: ⅛” pilot drill bit b Placement of the legs is very important.
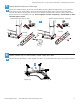
Workrite Sierra HX™ 3-Leg Crank Workcenters - Assembly Instructions 3 a To avoid stripping the threads, always insert and make the first few turns of the screw BY HAND with an Allen wrench (N), ensuring it is in straight. Attach Long Braces to Side Legs With legs on their sides, attach one Long Brace (B) to back of each Side Leg Cap using Button Head Screws (J). The Braces should have the lip on top, facing away from the legs.
Workrite Sierra HX™ 3-Leg Crank Workcenters - Assembly Instructions 5 a Attach Medium Braces to Side Legs Attach one Medium Brace (E) to end of each Side Leg using Button Head Screws (J). If you have a 24” deep or less worksurface, use the holes towards the back of the brace so that the brace extends out above the long part of the foot. For deeper worksurfaces, use the center holes of the brace so that it is centered on the leg.
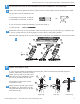
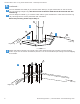
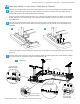
Workrite Sierra HX™ 3-Leg Crank Workcenters - Assembly Instructions 6 continued... b c Use one Shallow Hex Shaft (K) to connect Crank Tube (D) to gear mechanism in side of Center Leg (O) pointing to Right Leg. The shorter end of the hex shaft should be inserted into the Center Leg. Use one Deep Hex Shaft (L) to connect Crank Tube to gear mechanism in other side of Center Leg (O). See diagram for correct placement and orientation. Base-Only models, please skip to Step 7.
Workrite Sierra HX™ 3-Leg Crank Workcenters - Assembly Instructions 7 Attach Side Legs to Hex Shafts and Crank Tubes a Use remaining Deep Hex Shaft (L) to connect Right Leg to Crank Tube (D), inserting short end of shaft into leg and long end into Crank Tube. b Use remaining Shallow Hex Shaft (K) to connect Left Leg to Crank Tube (D), inserting short end of shaft into leg and long end into Crank Tube. Base-only models, skip to step 9.
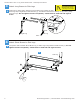
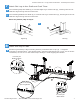
Workrite Sierra HX™ 3-Leg Crank Workcenters - Assembly Instructions 9 Attach and Connect Crank Handle a Attach Crank Handle Assembly (I) to Leg by inserting the short end into the hole in the leg, making sure that the handle clears the table top when extended. b Secure the Crank Handle Assembly to the Leg, using one Button Head Screw (J). c If you do not have a Workrite tabletop: Proceed to Step 10.
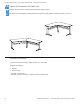
Workrite Sierra HX™ 3-Leg Crank Workcenters - Assembly Instructions 10 Base-Only Models: Loosely Secure Table Base to Tabletop a Position the leg assembly on the face-down table top. Center the assembly on the table so that neither of the side legs overlap the edge. Measure carefully to ensure that your table will be positioned correctly as detailed below before drilling. With the Crank Handle pushed all the way in, position the Medium Brace as shown in the figure below, based on your table depth.
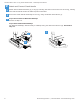
Workrite Sierra HX™ 3-Leg Crank Workcenters - Assembly Instructions 11 Tighten All Screws and Flip Table Over a b Tighten all Wood Screws connecting handle and legs to desk. Flip table over and adjust Leveling Glides if required so that table is steady and does not rock. Cleaning instructions To clean the Sierra HX legs, apply cleaner to a soft cloth. Suggested cleaners: • Windex • Formula 409 —Do NOT use solvents —Do NOT saturate or spray cleaners directly to table base 10 Workrite Ergonomics | 800.