
Assembly Instructions for Front and Top-Crank models Instruction Manual


8 Workrite Ergonomics | 800.959.9675 www.workriteergo.com
Workrite Sierra™ Crank Workcenters - Assembly Instructions
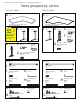
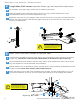
AttachCrankTubesandCrossbarstoLegsandTable
LeftLeg:UseShortEndHexShafttoconnectLegtoCrankTube,insertingshortendofshaftinto
leg and long end into Crank Tube.
RightLeg:UseLongEndHexShafttoconnectLegtoCrankTube,insertingshortendofshaftinto
leg and long end into Crank Tube.
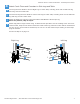
AttachCrossbarstosidelegsusingtwoButtonheadMachineScrewsperleg.Base-only models,
skip to step 5.
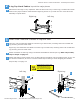
AttachtopplateofLegstodeskusing10WoodScrewsprovided.Usethelocatingholes.Keepthe
twoholesnearesttheinsideofthelegwherethecrankwillbeinsertedfreefornow.Ifyouusean
electricscrewdriver,besureitisonthelowesttorquesettingtoavoidstrippingthethreads.
Skip to Step 5 on page 10.
a
c
M
J
P
I
RightLeg
b
L
a
P
J
H
H
I
c
b
Left Leg
a
b
c
2
3
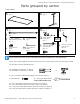
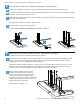
To avoid stripping the threads when
attaching crossbars, always insert
and make the rst few turns of
the screw BY HAND with an Allen
wrench, ensuring it is in straight.
2-leg Front-Crank Tables:Layoutthemajorpieces
Placementofthelegsisveryimportant.Takethetimenowtolayoutthelegs,crossbarsandcrank
tubesintheproperlocation.NotethattheRightLegwillbeonyourleftandviceversawhenthe
assembly is upside down.
a
I
B
H
B
A
RightLeg Left Leg