
Assembly Instructions for Front and Top-Crank models Instruction Manual


Workrite Ergonomics | 800.959.9675 www.workriteergo.com 7
Workrite Sierra™ Crank Workcenters - Assembly Instructions
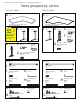
a
d
M
J
P
I
RightLeg
c
b
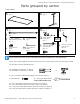
d
M
J
P
I
Left Leg
c
a
b
c
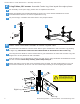
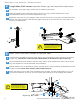
AttachCrankTubesandCrossbarstoSideLegsandTable
UseLongEndHexShafttoconnectRightLegtoCrankTube,insertingshortendofshaftintoleg
and long end into Crank Tube.
UsesecondLongEndHexShafttoconnectLeftLegtoCrankTube,insertingshortendofshaftinto
leg and long end into Crank Tube.
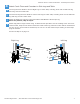
AttachCrossbarstosidelegsusingtwoButtonheadMachineScrewsperleg.
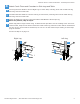
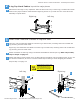
Base-only models, skip to step 5.
AttachtopplateofLegstodeskusing10WoodScrewsprovided.Usethelocatingholes.ForFront-
crankmodels,keepthetwoholesnearesttheinsideofthelegwherethecrankwillbeinsertedfree
fornow.Ifyouuseanelectricscrewdriver,besureitisonthelowesttorquesettingtoavoidstrip-
pingthethreads.
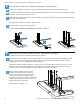
Proceed to Step 5 on page 10.
d
4
H
H