
Assembly Instructions for Front and Top-Crank models Instruction Manual


Workrite Ergonomics | 800.959.9675 www.workriteergo.com 11
Workrite Sierra™ Crank Workcenters - Assembly Instructions
¾
6
a
b
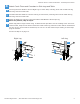
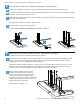
Base-OnlyTop-Crankmodels:SecureTableBasetoTabletop
ForBase-OnlyFront-Crankmodelspleaseseepage10.
Positionthelegassemblyontheface-downtabletop.Centertheassemblyonthetablesothat
neitherofthesidelegsoverlaptheedge.Measurecarefullytoensurethatyourtablewillbe
positioned correctly as detailed below before drilling.
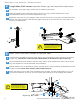
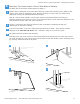
Mark¾"holeforcrankhandle:Tracearoundoutsideoflegbracketbeforeremovingleg
assembly.Measurefromfrontleftcorneroflegbracketasshown,thenmarkholeplacement.The
holeshouldbedirectlyunderthecenteroftheleg.
Usethe⅛"drillbittodrillfromthebottomoftheworksurfacecompletelythroughthe
worksurface as step one in drilling.
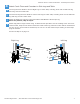
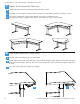
Turntheworksurfaceovertothetop/goodnishsideandusethe¾"wingdrillbittonish
drillingtheholefrom the top down,to¾"diameter,usingthe⅛"holeasaguide.
Flip table back and reposition leg assembly.
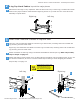
Drillpilotholesandinsertscrewsfortwopositioningholesrstbeingsuretocenterthelegover
thecrankhandlehole,thenusetheotherscrewholestomarkthelocationoftheremainingholes
foreachleg.Attachthedeskatallpoints.
b
a
c
c
1¼"
6½"
var.
var.
d
d