Lincoln™ Under-cabinet Light Installation Instructions #1500178 Rev A
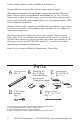
Lincoln Under-cabinet Light Installation Instructions Congratulations on your new Lincoln Under-cabinet Light! Whether purchased for its significant energy savings and efficiency, lower lifetime costs, environmental considerations, or just to find a better way to light your work area, your Lincoln Under-cabinet Light will provide consistent and reliable light from the highest quality LEDs and components available. Please read this guide carefully and follow the installation instructions.
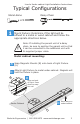
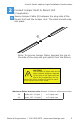
Lincoln Under-cabinet Light Installation Instructions Typical Configurations Stand-Alone 1 Daisy-Chain Mount Fixture: Determine if the light will be affixed to a metal or wood cabinet and follow the appropriate directions below. ! Note: If installing the parent unit of a daisy chain, be sure to position the parent unit so that it can be connected to the additional unit with its supplied jumper cable. Metal cabinet mounting: a Snap Magnetic Mounts (B) onto back of Light Fixture (A).
Lincoln Under-cabinet Light Installation Instructions Wood cabinet mounting: Note: You will need a #2 Phillips-head screwdriver to complete this step. a Determine where you want to mount your Light and draw a straight line on the underside of the cabinet to indicate the center along the length of the Light. Be sure it is far enough away from the front of the cabinet to prevent the Light from protruding out from the edge. b Attach Wood Mounts (B) along your line with Screws provided.
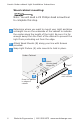
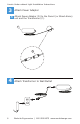
Lincoln Under-cabinet Light Installation Instructions 2 Connect Jumper Units to Parent Unit (if applicable) a Secure Jumper Cable (E) between the plug side of the Parent Unit and the Jumper Unit. The cable should snap into place. E Note: To remove Jumper Cable, depress the clip on the side of the plug and pull gently from the fixture. CAUTION The number of lights that can be daisy-chained together depends on the size of the lights and the size of the transformer.
Lincoln Under-cabinet Light Installation Instructions 3 a Attach Power Adapter Attach Power Adapter (D) to the Parent (or Stand-Alone) unit and the Transformer (C). C D 4 6 Attach Transformer to Wall Outlet Workrite Ergonomics | 800.959.9675 www.workriteergo.
Lincoln Under-cabinet Light Installation Instructions Troubleshooting Tips The Lincoln Under-cabinet Light will not turn on • Check all wire and cable connections. Make sure they are completely and fully engaged. • Check that the jumper cables or power adapter cables have not come loose from their connectors • Make sure that the Transformer is plugged into the wall. • If a daisy chain, ensure the correct transformer is used for the number of LEDs in the chain.
Lincoln Under-cabinet Light Installation Instructions Troubleshooting Tips, continued The Lincoln Under-cabinet Light with an occupancy sensor will not turn off • • The time on the occupancy sensor automatic shutoff is set at the factory for 15 minutes. Cover the occupancy sensor and record how long it takes for the light to turn itself off.