
Technical data


45
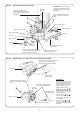
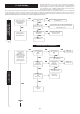
Replace “O” ring seals
Slip joint
Flow pipe (shortest)
Flow connection
Flat clip
Replace “O”
ring seals
Remove screw and support
bracket from gas valve
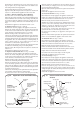
Domestic drain. Remove clip and
ease downwards 10mm approx. and
remove from bottom manifold
Domestic
drain clip
Push in flat plate clamp to
release elbow
Replace
“O” ring
seals
Return connection
Slip joint
Return pipe (longest)
Move assembly upwards 10mm
approx. to clear flow and return
pipes
WARNING: There will be a small
quantity of water remaining in the
pipework and water-to-water heat
exchanger
Ease water to water heat
exchanger and bottom manifold
out of support bracket and clear
of appliance
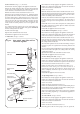
15
13
12
11
14
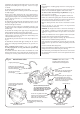
Fig. 48. Water to water heat exchanger.
Top manifold
Water to water
heat exchanger
Water to water
heat exchanger
Locate raised section of hole into
the water to water heat exchange
port
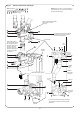
Replace the “O” ring seals in the top and
bottom manifold. Ensure they are
positioned in the locations provided
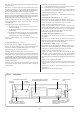
IMPORT
ANT:
Before the water diverter
valve is re-assembled ensure
the domestic drain pipe and
clip are fitted to the bottom
manifold. Refer to Fig. 48.
Before tightening screws 1 2
2 5 6 7 8 11 12
ensure the “O” ring seals are
fully pushed into their
respective housing.
Ensure screws 13 and 14,
securing the bottom manifold
to the support bracket, are
fully tightened.
Ensure screws 9 and 10,
securing the top manifold to
the support bracket, are fully
tightened.
Locate hole in bottom manifold
over internally threaded boss
Replace the “O” ring seals
Bottom manifold
1
13
9
14
25 6 7 8 11 12
10
Fig. 49. Replacing the “O” ring seals in top and bottom manifolds.
15