Information to the user This equipment has been tested and found fo comply with the limits for a Class B digital device pursuant to part 15 of the FCC Rules. These limits are designed to provide reasonable protection against harmful interference in a residential installation. This equipment generates, uses and can radiate radio frequency energy and, if not installed and used in accordance with the instructions, may cause harmful interference to radio communications.
Before Setting up Brief Specification of LCD Monitor Precautions Setting up the LCD monitor Where is a good place to position the mentor? Control Sitting Degree. — Check before connecting the power cord and the signal cable ! How to connect the power cord and the several cables to the LCD monitor. 11 Connecting Your LCD Monitor Plug & Play 12 Warm-up Time 13 Adjusting The Monitor The Function Control Buttons How to use the Hot Key.
* HLMI7OM/HLMIT0S OSD MENU ADJUSTMENT & INPUT SOURCE VIDEOCASSETTE, TV Appendix — Appendix A. Specifications Appendix B. Display Modes Appendix C. 15-pin D-Sub Connector Appendix D. 24-pin DVI Connector Appendix D.
1 Before setting up This is 17.0 inch T FT-LCD monitor. Before setting up the LCD Monitor, please read this manual to help your understanding of the LCD Monitor. Brief Specification of LCD Monitor errors = Resolution : 17.
HLMI70M/HLMIT0S * Precautions 230V Clock the voltage corresponds to the local electrical supply before connecting the AC power cord, Dino use Ketone type material (ex. Acetone), Ethyl Alcohol, Toluene, Ethyl Acid or Methyl chord, to clear the panel. Jt might permanently damage the panel.
es por Don’t touch the screen with a acute nail and pin ‘The LCD monitor consists of electrical devices, If the LCD monitor is damaged, accountant immediately our service center “The LCD monitor can be darn aged easily by shock. Tf you don't use the LCD monitor for a long tire, unplug the LCD monitor, age Dot use your LCD monitor under direct sunlight.
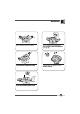
* HLMI7OM/HLMIT0S RCA Cable 4 Audio Cable Police Please make sure the following items are included with your monitor. If any items are missing, contact your dealer.
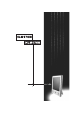
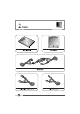
3 Setting up the LCD monitor Where is a good place to position the Monitor? ny Place the LCD monitor on a solid and flat surface. If dropped, the screen can be damaged easily. You can see a supporting prop on the backside of the LCD monitor. Tilt the screen until you feel comfortable for working Tilting Degrees (Up/Down) : +10/430 Degrees ud Check before connecting the power cord and the signal cable !! ey Turn off the PC power before connecting the power cord and signal cable to the LCD monitor.
How to connect the power cord and the several cables to the LCD monitor. } PC VIDEO If @ EEE. THe Name le connections Name le connections DC12V DC Adapter VIDEO VIDEO Cable DVI Digital Video Cable 8 | AUDIO Audio output (R) FC signalization Cal | 8 | AUDIO Audio output L) SPIN Speaker Cable 0 | UNEQUAL External Audio System Cable HEADPHONE Headphone Cable ANTENNA Antenna Cable 8 | VIDEO! TANCRED Cable * VIDEO Part is only HLM170M.
HLMI70M/HLMIT0S * Connecting Your LCD Monitor When you can connect the power cord fo the DC adapter u Connecting your PC system 1. Connect the 16-pin D-Sub Signal Cable from PG to No.3. 2. If you have a DVI compliant video graphics adapter, connect Digital Video Cable from PC to No.2. 3. If you usa a speaker, connect the Audio Cable from PC to No.4 4. If you usa a headphone and harpoons, connect the Headphone Cable from Conn acting your AV(DVD, VIDEO, CAMCORDER) & TV 1.
* HLMI7OM/HLMIT0S Warm-up Time All LCD monitors need time to become thermally stable whenever you tum on the monitor after letting the monitor be fumed off for a couple of hours. Therefore, to achieve more accurate adjustments for parameters, allow the LCD monitor to be warmed up for at least 20 minutes before making any screen adjustments.