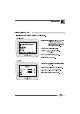
4 Adjusting The Monitor MERE. POWER 8 5 How to use the Hot Key. MOD : When you push the mode button, the mode changes PC ry DIGITAL 0) e VIDEO [) VIDEO [$ TV. When the mode changes, time spend 2~3sec. AUTO | : When you push Auto button, this will optimize image quality automatically. : When you push the : When you push the Left/Right button, you can Up/Down button, you can . | adjust the channel. adjust the volume.
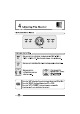
* HLMI7OM/HLMIT0S Main OSD Menu When you push the menu button, you can see below main OSD menu. MAIN MENU x TRANSCONTINENTAL &7 COLOR = Position 1280 X 1024 79 kHz / 75Hz on Ban BRIGHTNESS/CONTRAST steer 00 [CRETE eT ET = Brightness : Changes the overall light intensity of the images being displayed. u Contrast : Changes the ratio of light intensity between the brightest white and darkest black. = You can adjust contrast values that you want by this hot key.
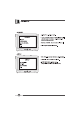
HLMI70M/HLMIT0S * POSITION & CLOCK/PHASE — — ooo Clock / Phase = When Image Is hot clear, you can use clock/phase menu. = PHASE! CLOCK : Although ‘Auto Adjustment’ automatically finds the optimum values of Clack and Phase parameters as well as Image position, It may be necessary for you to adjust those parameters manually. Its recommended for you to use ‘Auto Adjustment’ first. If the adjustment results are not satisfactory, then use Clock and Phase adjustment features to get the bast adjustment results.
* HLMI7OM/HLMIT0S COLOR u The phone of color can be changed form bluish white to reddish white.
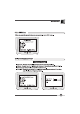
HLMI70M/HLMIT0S * OSD MENU ADJUSTMENT & INPUT SOURCE ny un Sets the OSD menu display position. = OSD Position : Moves the OSD menu to the horizontal or vertical direction. m OSD TIME : Shows the OSD TIME displays from & to sec. MAIN MENU x ER STRAIGHTFORWARDNESS 0SD POSITION ru Br OSD TIME » GO SEC | setup INPUT SOURCE » ANALOG ED ExT EXT 1280 X 1024 79.9KHz / 75Hz ve @ oo [LTR = INPUT SOURCE : Selects input signal. (PCO DIGITAL ©) VIDEO 03 VIDEO 1) TV) ‘The mode button can adjust Input Source by hot key.
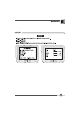
* HLMI7OM/HLMIT0S VIDEOCASSETTE, TV u Apply these functions (VIDEO, VIDEO, TV) to HLM170M. « MAIN MENU MAIN MENU xx BRIGHTNESS / CONTRAST Fy COLOR CHANNEL 1280 X 1024 79.9KHz / 75Hz ss foe » COLOR COLOR SHARPNESS 4 COLOR TINT EXIT + BRIGHTNESS / CONTRAST : Increase or decreases the light intensity of the screen / increase or decrease the ratio of the light intensity between the brightest white and the darkest black. + COLOR : Refer to below color many. = CHANNEL : Refer to below channel menu.
HLMI70M/HLMIT0S * + CHANNEL CHANNEL AIRCRAFT AUTO CHANNEL MANUAL CHANNEL FINE EXIT SETUP SETUP OSD POSITION OSD TIME INPUT SOURCE EXIT ce on « AIR/CATV : Select AIR or CATV. + AUTO CHANNEL : Search the channel automatically. (SELECT button 0) 4 button : select channel 0) SELECT button (ADD/DEL)) + MANUAL CHANNEL : Search the channel manually. + FINE : Adjust image quality of the TV. « OSD POSITION : Sat the OSD menu display position. + OSD TIME : Show the OSD display time.
Appendix A.
HLMI70M/HLMIT0S * Dimensions Outside Wright Mani % The specification of this monitor is subject to be changed without notice to improve performance. * *1 is option * “2 is HLM170M only Appendix B.
* HLMI7OM/HLMIT0S Appendix C.
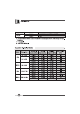
* HLMI7OM/HLMIT0S Appendix D. DIMS Power Saving Mode® This monitor has a built-in power management system called DIMS Power Saving Mode. This system saves energy by switching your monitor into a low-power mode when it has not been used for a certain period of time. The available modes are “ON”, “Standby”, “Suspend”, and “OFF. . nt I LED Color ar ime rang status Under Active Active Active Walt teen ‘Alternating Stand! by Inactive Active Blanked Green/Orange mode (0.
6 Troubleshooting ol suggested Act Screen is blank and power indicator is off + Ensure tht the power cord is firmly connected and the LCD ‘monitor is on. “out of range" message + Check the maximum resolution and the frequency of the video ‘adapter, . these values with the data in the Display Modes Timing Chart. “No signal input’ message + Ensure that the signal cable is firmly connected to the PC or video sources. + Ensure that the PC or video sources are turned on.