
User's Manual


56
5] or any of the Input Selectors [oval 4] on the remote. The LED in the Standby/On Button
[square 2] will turn green to confirm that the unit is on.
Using the On-Screen Display
When making the following adjustments, you may find it easier to use the AVR21EN’s on-screen
display system. These easy-to-read displays give you a clear picture of the current status of the
unit and make it easy to see which speaker, delay, input or digital selection you are making.
To use the on-screen menus, make certain that you have made a connection between either the
Monitor Component Video Outputs [circle 15] or the Video Monitor Outputs [circle 40] and
the matching inputs on your TV, display or projector. In order to view the menus, make certain
that the proper video input type has been selected on the display, and that any configuration
required for the display, such as selection of interlace or progressive scan has been made. To
take advantage of the AVR21EN’s advanced video circuitry, when a component video connection
is in use, make certain that the display is configured for “480p, 720p or 1080i” if available.
IMPORTANT NOTE: When viewing the on-screen menus using a CRT-based projector, plasma
display or direct-view CRT monitor or television, it is important that they not be left on for an
extended period of time. The constant display of a static image such as these menus may cause
the image to be permanently “burned into” the projection tubes, plasma screen or CRT. This type
of damage is not covered by the AVR21EN Warranty and may not be covered by the projector/TV
set’s warranty.
The AVR21EN has two on-screen display modes, “Semi-OSD” and “Full-OSD.” When making
configuration adjustments, it is recommended that the full-OSD mode be used. This will place an
easily viewed list of the available options on the screen.
Making Configuration Adjustments
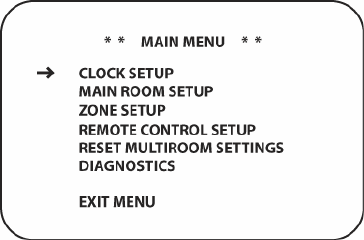
The full-OSD system is available by pressing the AVR (System) Button [oval 5] followed by the
Menu Button [oval 44] on the AVR21ENR1 Main Room Remote. When these buttons are
pressed, the MAIN MENU (Figure 16) will appear, and adjustments are made from the individual
menus.
Figure 16 Main Menu
The semi-OSD system is also available, allowing you to make adjustments directly, by pressing
the appropriate buttons on the AVR21EN front panel or AVR21ENR1remote control for the
specific parameter to be adjusted. For example, to change the surround mode for any of the
sources, on the remote, press the Surround Button [oval 13] and then press the
▼/▲Navigation Buttons [oval 16] or on the AVR front panel, press the Surround Mode Group
Selector [square 4] and then the Surround Mode Selector [square 5] to scroll through the list
of options as they appear in the on-screen display or in the Lower Display Line [square 34].