
Technical data


Mountain Series CE
Installation and Operation Manual
9
An ongoing program of product improvement may require us to change
specifications without notice. WS-MS-(RFG, RFG-IR)-CE,
Revised May 2014 Doc no: M0037.01
info@woodstone-corp.com or visit woodstone-corp.com
wood stone corporation
1801 w. bakerview rd.
bellingham, wa 98226 usa
t. +1.360.650.1111
f. +1.360.650.1166
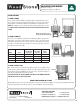
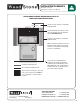
MANTLE MOUNTING
The initial steps are the same for mounting either a stainless mantle or a bracket for a granite mantle�
INSTALLATION OF GRANITE
After completing the steps outlined above, apply a generous amount of silicone adhesive (provided) to the top of the steel mantle
bracket�
Put the stone in place and apply light
pressure to seat it properly� Make sure that
the angle in the granite lines up with the
angle in the bracket� Allow the sealant to
set for several hours before filling any gap
between the stone slab and the metal bracket
with the silicone sealant (provided)� Clean up
any sealant before it dries�
1. Begin by installing the threaded studs into
the clip nuts below the oven doorway (3 or 4
turns is sufficient)�
2. Position the mantle (or bracket) on the oven,
making sure the rear flange rests on the
floor of the oven (you may need an extra pair
of hands)�
3. Place one stainless steel washer and a cap
nut onto each stud� Tighten the cap nuts so
the mantle is securely held in place�
4. Using the high temperature silicone
(provided), fill any gaps between the oven
hearth and the mantle flange� Gaps between
the mantle flange and the stainless steel
doorway frame may also need to be filled
with a small amount of the silicone sealant�
Clean up any sealant before it dries�
MANTLE MOUNTING