
Technical data


Mountain Series CE
Installation and Operation Manual
20
An ongoing program of product improvement may require us to change
specifications without notice. WS-MS-(RFG, RFG-IR)-CE,
Revised May 2014 Doc no: M0037.01
info@woodstone-corp.com or visit woodstone-corp.com
wood stone corporation
1801 w. bakerview rd.
bellingham, wa 98226 usa
t. +1.360.650.1111
f. +1.360.650.1166
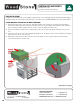
VENTING DO’S AND DONT’S
HOOD INSTALLATIONS
In addition to the information given for installations using the direct connect venting method, the following information applies to
installations where the oven is being vented using a Type 1 hood� Also refer to the OVEN VENTING section earlier in this manual�
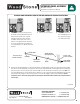
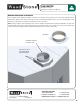
PROPER MOUNTING POSITION FOR THE WOOD STONE HOOD
1.
Center the hood from side to side on the oven� Note that in an MS-5, 6 or 7 model, the oven has the round flue adapter
attached� The adapter may prevent the proper positioning of the hood� The flue adapter is attached with screws� (The MS-4
does not require an adapter�) Simply remove the screws to remove the adapter if it is in the way�
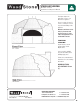
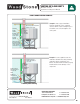
2. Pull the hood forward so that the notch, as viewed from the side of the hood, lines up with the front edge of the top of the
oven�
3. Secure the hood to the top of the oven using #10 self tapping screws� The flanges on the hood are pre-drilled� Screw directly
into the top of the oven to secure the hood�
4. Attach grease-rated duct to the outlet on the hood� The hood captures over the oven flue collar and oven doorway� No
connection is made to the oven flue collar�
Continued on next page