
Owner's manual

CO., INC.
®
Rev. 0.1 / 05-10 Instruction Sheet 32606 RAM
Vacuum Cups for
RAM
®
Mounts
Instructions for Use,
Maintenance and Care
14
5
4
3
8
9
2
1
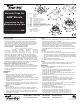
1. 60024 Air Filter
2. Release Tab
3. Plunger
4. Red Line
5. 90111 Pump
6. 49326T Vacuum Pad, 3" Dia. (TL3)
7. 49345T Vacuum Pad, 4 1/2" Dia. (LJ45)
8. 49386T Vacuum Pad, 6" Dia. (TL6)
9. 10014 Screw, 10-32 x 7/16"
10. 10024 Screw, 10-32 x 5/8"
11. 60075 Accessory Mount, Steel, with 1" Ball
12. 60074 Accessory Mount, Polycarbonate, with 1" Ball
13. 60180 Accessory Mount, Polycarbonate, with 1/4-20 Stud
14. 50210 Accessory Mount, Aluminum, with 1/4-20 Stud
15. 10156 Screw, 10-32 x 1/4”
Not Shown
29306MM Pad Cover, 3"
29308 Pad Cover, 4 1/2"
29312 Pad Cover, 6"
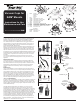
1
2
3
4
5
6
11
15
5
4
3
10
1
13
7
2
3
8
1
2
5
4
9
12
3
2
12
5
4
7
1
10
CO., INC.
®
908 West Main - P.O. Box 368 800.548.7341 406.628.8354 (fax)
Laurel, MT 59044 U.S.A. 406.628.8231 www.powrgrip.com
Products are manufactured under an
ISO 9001 quality management system
I
S
S
O
9
0
0
1
:
2
0
0
8
S
Y
S
T
E
M
C
E
T
F
I
C
T
I
O
N
R
I
A
S
SPECIFICATIONS
Product Description
Wood’s Powr-Grip
®
vacuum cups use vacuum to mount small loads
temporarily, as follows: A manual pump removes air from between the
rubber pad and the contact surface; a red line on the pump’s plunger
serves as a vacuum indicator; a check valve allows the user to repump
the cup without removing it from the contact surface; and a release
mechanism allows the cup to disengage completely.
Nominal Cup Size Maximum Load Capacity*
at the given distance from the center of the pad surface
4" [10 cm] 6" [15 cm] 12" [30 cm] 18" [45 cm]
3" [8 cm] dia 3 lbs [1.4 kg] 2 lbs [0.9 kg] not rated not rated
4½" [11 cm] dia 15 lbs [6.8 kg] 10 lbs [4.5 kg] 5 lbs [2.3 kg] 3 lbs [1.4 kg]
6" [15 cm] dia 26 lbs [11.8 kg] 18 lbs [8.2 kg] 9 lbs [4.1 kg] 6 lbs [2.7 kg]
*Maximum Load Capacity includes a 3:1 safety factor and requires
the following: attachment on clean, smooth, nonporous at surfaces; a
minimum vacuum level of 17½" Hg [-59 kPa]; and a friction coefcient of
1. This rating is based on tests of new vacuum cups attached to static
objects in ideal conditions. Many factors can reduce the capacity, such
as dynamic loading (eg, mounting loads on moving vehicles) or attaching
equipment that applies more leverage to the cup than is intended for its
design. See www.powrgrip.com for more information.
Contact Surface and Environmental Conditions
Use the cup on clean, relatively smooth, nonporous surfaces, at
temperatures from 0° to 120° Fahrenheit [-18° to 49° Celsius]. Moisture
or contaminants can reduce the slip resistance of the cup. The red-line
indicator may not perform reliably at elevations above 5000 feet [1524
meters]; see Service.
OPERATION
To Attach
1) Clean the contact surface and, if needed, the face of the vacuum
cup (see Cleaning). CAUTION: Test the cup for staining or
deformation of surfaces with light colors or soft coatings.
2) Position the cup so the red line will be visible if it should appear while
the cup is attached.
3) Pump the plunger until the cup attaches completely. When the red line
is hidden, the cup is ready for use.
4) Check the plunger frequently to make sure the cup remains securely
attached. If the red line appears, pump the plunger until the red line is
hidden again (see WARNINGS).
To Release
1) Secure the load.
2) Pull a release tab until the cup disengages completely. CAUTION:
Remove the cup when not in use. If the cup remains attached to a hot
surface (eg, in direct sunlight) for an extended time, the rubber pad
could bond with the surface, resulting in damage to the surface or to
the pad when it is removed.
MAINTENANCE
Service
Regularly make sure the vacuum cup’s air lter is in place. If not,
discontinue use until the lter is replaced.
Since aging and wear reduce the capacity of the vacuum pad, it should be
replaced at least once every 2 years or whenever damage is discovered.
If the cup does not function normally, the cup face may be dirty or
damaged, or the pump may require service. First clean the cup face
according to the directions to follow. If the problem persists, contact an
authorized dealer or visit www.powrgrip.com for replacement parts and
assistance.
Cleaning
1) Remove the air lter from the cup face.
2) Use a clean sponge or lint-free cloth to apply soapy water or another
mild cleanser to the cup face; see WARNINGS and www.powrgrip.com
for more information. CAUTION: To prevent liquid from contaminating
the pump, hold the cup face-down or cover the suction hole in the lter
recess.
3) Wipe all residue from the cup face.
4) Allow the cup to dry and reinstall the air lter.
Storage
Store in a clean, dry location out of direct sunlight. Protect the cup face
from damage using the pad cover or another appropriate means.
WARNINGS
Failure to observe WARNINGS could damage the vacuum cup or the load,
or cause injury to the user.
• Do not use the cup to support loads that exceed the Maximum Load
Capacity or the effective load capacity (see SPECIFICATIONS).
• Do not use the cup to support a person.
• Do not use the cup to support loads which could injure people if the cup
disengages unexpectedly.
• Do not place the cup face against surfaces which could damage the
sealing edge of the rubber pad.
• Avoid conditions that could cause the cup to slip or to disengage
prematurely, such as: contaminants, cuts or scratches in the cup face or
contact surface; applying the cup to porous materials; or applying
pressure against the cup edge.
• Do not use the cup when the red line is visible. If the red line reappears
frequently, discontinue use and see Service.
• Do not allow anything to interfere with free movement of the plunger
while the cup is attached.
• Do not touch any release tab while using the cup.
• Do not leave the cup in use and unattended.
• Do not use harsh chemicals (such as solvents or gasoline) or
unauthorized rubber cleaners and conditioners to clean the cup.
• Do not use harsh chemicals (such as solvents or gasoline) or
unauthorized rubber cleaners and conditioners to clean the cup.