
Manual

Rev. 3.3 / 04-14 Instruction Sheet 32605 PHC
LJ45PHC
Instructions for Use,
Maintenance and Care
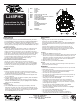
1. 60024 Air Filter
2. Release Tab
3. Plunger
4. Red Line
5. 90111 Pump
6. 49345T Vacuum Pad, 4 1/2" Dia. (LJ45)
7. 10024 Screw, 10-32 x 5/8"
8. 60181 Accessory Mount, Polycarbonate, 1/4-20 Insert
9. 97955 CLEAT Mounting Head
10. Mounting Stud of Ball Mount
11. Contact Plate of Ball Mount
12. Arms
13. Pivot Post
14. Ball Mount/Arm Release Knob
15. Swivel Plate Release Knob
16. Swivel Plate
Not Shown
29308 Pad Cover, 4 1/2"
{
5
4
3
10
9
7
8
2
1
6
A
C
B
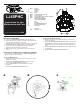
MOUNTING OF EQUIPMENT
1) Position the CLEAT mounting head as shown (see gure A).
2) Hold the equipment (eg, camera, camcorder or other devices with
1/4-20 female thread) securely in one hand.
3) Grasp the vacuum cup with the other hand as shown, and insert the
mounting stud into the female threads on the equipment base.
4) Turn the cup until the contact plate seats rmly against the
equipment. Note: Be careful not to over-tighten.
5) Attach the cup securely to the mounting surface as directed on
reverse.
ADJUSTING THE ORIENTATION OF MOUNTED EQUIPMENT
Two knobs control all adjustments of the CLEAT mounting head, as
required to level, tilt or pan equipment.
To Turn the Mounting Head
1) Make sure the vacuum cup is attached securely to the mounting
surface (see reverse).
2) Loosen the swivel plate release knob enough to allow 360°
movement of the swivel plate (see gure B).
3) Turn the swivel plate to the desired position for using the
equipment.
4) Tighten the swivel plate release knob securely.
To Adjust the Ball Mount and Arms
1) Make sure the vacuum cup is attached securely to the mounting
surface (see reverse).
2) Loosen the ball mount/arm release knob enough to reposition the
ball mount and/or allow 225° movement of the arms (see gure C).
CAUTION: Be sure to support the equipment while loosening the
knob.
3) Adjust the ball mount and/or arms to the desired position for using
the equipment.
4) Tighten the ball mount/arm release knob securely.