
Installation Guide

Preparation and installation of the PVC Shower Pan Liner and connection to the
Wondercap Tile Shower Outlet as per IAPMO UPC 1-2018 408.0 Showers
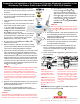
1. Position the Wondercap Tiled Shower Outlet into shower
drain outlet – ideally, the location should be in the center of
the shower.
2. Clean, prime and solvent-weld flange tail
1
into drainage
pipe. Ensure flange sits flush with floor and secure with 4
counter-sunk screws.
3. To form the pre-slope, mark out the height of pre-slope
on external walls of shower, allowing a fall of ¼” per foot.
Fill with dry pack mortar and screed back to edge of outer
Wondercap flange
1
. Install the curb/rough threshold. Once
bedding is set, form the curb/shower step by packing in a
dry mortar mix and trowelling to the desired thickness of
shower step. The curb should be no less than 2” in height
above the internal shower bedding floor and no more than
9” in height.
4. Once dry, remove inner flange
2
and the
base
3
& cap
4
component and set aside.
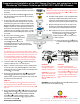
5. Position shower pan liner
8
over the
outer flange
1
and install pan liner as
required by manufacturer. The sides of the pan liner
are supported and nailed 1” above to the pre-installed
horizontal timber support.
PRO TIP!
It is important the liner is turned up the walls at least 3” higher
than the finished dam and the pan liner sides are nailed no lower
than 1” above the finished curb (shower step) or threshold. The
liner should extend up and over the curb(where shower door/
screen will sit) and fasten to the outer floor area. Prefabricated
corners can be bonded in areas where folding is not possible.
6. Locate inner edge of outer flange
1
(screwed to the floor) and
carefully cut away the inner circle of the pan liner.
7. Apply a ½” bead of clear, all-purpose silicone (caulking) sealant
to inner top surface of the outer flange
1
(on the surface of the
shower pan liner) and ½” bead of silicone to the underside of the
inner flange
2
(½” from edge).
8. Clean, prime and solvent-weld inner flange
2
and outer flange.
Insert flange
2
through the pan liner and press down with a
twisting motion, maintain a firm pressure for a few seconds until
the solvent cement has taken hold.
PRO TIP!
Using the supplied blue test plug
5
, flood test the shower pan
liner. The shower pan liner flood test should be held for up to 4
hours to guarantee a water tight connection. Discard test plug
5
after use.
9. Reinsert the Wondercap base
3
& cap
4
component into the inner
flange
2
. Raise the base
3
& cap
4
component to required mortar
height and apply a mortar mix in and around the underside
of base
3
& cap
4
to support and hold in position – always
use a spirit level to ensure the base
3
& cap
4
component is
perpendicular to the flange
1
.
Do not remove protective cap.
Wondercap USA, Inc 1270 Caroline St Suite D120-435, Atlanta GA 30307
Ph: 844-966-3370 E: sales@wondercap.com W: www.wondercap.com
PRO TIP!
Make sure to allow for tile thickness when raising the base
& cap to the required height. The base
3
& cap
4
should end
flush with the top of the tile.
10. Screed the shower bed with 1” layer of prepared mortar
mix and lay a suitable galvanized steel mesh or metal
lath over the shower prepared mortar and continue the
metal lath across the shower rough threshold (the step).
11. Apply the remaining mortar mix over the mesh or lath.
Screed back to shower drain outlet while maintaining
correct grade as per standard building requirements.
13. When laying floor tiles, the fall is maintained towards
drain and tiles are cut around the round strainer
using the protective cap
4
or strainer
7
as a
template. Square strainers are set up and cut
around as required.
14. Finally, remove protective cap
4
and seal
in the desired strainer
7
with tile glue and
grout.
Make your job
a Won d er !
Pierce here to
remove cap
DO NOTremo ve
until tiling is
complete
Pierce here to
remove cap
DO NOTremo v
until tiling is
complete
Pierce here to
remove cap
DO NOTremove
until tiling is
complete
Pierce here to
remove cap
DO NOTremove
until tiling is
complete
TILE SHOWER DRAIN OUTLET
www.wondercap.com
Strainer sold separately
TILE SHOWER DRAIN OUTLET
www.wonderc ap.c om
Strainer sold separatel y
Make your job
a Won de r !
Pierce here to
remove cap
DO NOTremov e
until tiling is
complete
Pierce here to
remove cap
DO NOTremov e
until tiling is
complete
Pierce here to
remove cap
DO NOTremove
until tiling is
complete
Pierce here to
remove cap
DO NOTremove
until tiling is
complete
TILE SHOWER DRAIN OUTLET
www.wondercap.com
Strainer sold separately
TILE SHOWER DRAIN OUTLET
www.wonderca p.c om
Strainer sold separately
PRO TIP!
If you have not allowed for tile
thickness, continue tiling to the drain
outlet. Tiles will finish ½” above the top
of the base
3
& cap
4
. Remove cap and
cut internal edge of cap
4
to the height
required to support selected strainer
(as per detail) to finish flush with the
tiles.
PRO TIP!
Raise adjustable base to
required mortar height,
allowing for tile thickness.
PRO TIP! For connection
with 2” linear drains insert
Wondercap reducing bush
6
into base
3
. Discard if not
required.
Remember: Discard test plug
5
after use and if NOT installing a linear
drain connection, discard reducing bush
6
.