
User manual


8
6. Set Film Type
E
nsure the Film Type setting is correct, or you will see X-ray-like image
on the viewer. Refer to File Type Table on page 9. The film type setting
will remain until changed even when F2D is powered off.
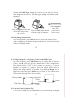
1. At Film Type menu, press OK/Enter key.
2. Press Left or Right key to highlight Color Negatives or Slides
Positive or B&W Negative then press OK key to select.
3. Press Left or Right key to highlight the type of film then press OK .
.
Film Type - Selects type of film to convert, refer to Film Type
Table on page 9
.
Delete All - Deletes all files in the internal memory or the inserted
SD/SDHC card
.
Convert - Converts film to digital image
.
Playback - Reviews all converted images stored in memory
.
USB MSDC - Communicates with PC or Mac to upload converted
images files to a computer
.
Language - Sets menu in English or Japanese
9
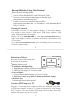
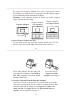
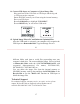
7. Select Proper Adapter or/and Insert
Select proper Adapter or/and Insert to convert your film, refer to
File type table
above. If 110 Insert or Super 8 Insert is selected,
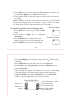
Film Type
Color
Negative
110
126KPK
135
Slide
Positive
Super 8
110
126KPK
135
B&W
(black &
white)
110
126KPK
135
Format
Film Width
16 mm
26 mm
35 mm
8 mm
16 mm
26 mm
35 mm
16 mm
26 mm
35 mm
Negative Adapter & 110 Insert
Negative Adapter only
Negative Adapter & 110 Insert
Negative Adapter only
Negative Adapter & Super 8 Insert
Slide Adapter only
Adapter or/and Insert to Use
*
Popular types in Bold & Italic
File Type Table