
Product Manual


Mounting
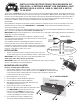
Hole Size
5/32"
Fig. 4
Foam
Gasket
LED Cluster
Mounting
Bracket
Flat Washer
Grill
Surface
Nut
Lock Washer
NOTE:
SEE ABOVE FIG. 3
FOR MOUNTING
HARDWARE USED TO
SECURE LED CLUSTER
TO BRACKET
Fig. 5 GRILL MOUNT
© 2019 Wolo Mfg. Corp. All Rights Reserved.
ANY EXPRESSED WARRANTY NOT PROVIDED HEREIN IS EXCLUDED AND DISCLAIMED. THE IMPLIED WARRANTIES OF MERCHANTABILITY AND OF
FITNESS FOR A PARTICULAR PURPOSE ARE EXPRESSLY LIMITED TO A TERM OF THREE (3) MONTHS. UNDER NO CIRCUMSTANCES SHALL WOLO
BE LIABLE TO PURCHASER OR ANY OTHER PERSON FOR ANY SPECIAL OR CONSEQUENTIAL DAMAGES, WHETHER ARISING OUT OF BREACH OF
WARRANTY OR OTHERWISE.
To obtain warranty service, return the product prepaid, and include the original bill of sale showing the date of purchase. Provide with the return
a brief description of the problem with a daytime telephone number. Also, include with the return a check or money order in the amount of
$20.00 to cover return shipping.
Mail to:
Wolo Manufacturing Corp.
Attn: Warranty Service
One Saxwood Street, Deer Park, NY 11729
E-mail: tech@wolo-mfg.com
Warranty
Wolo Manufacturing Corporation (“Wolo”) warranties to the original purchaser, for three months from the date of purchase, that this
product is free from defects in workmanship and materials. If there is such a proven defect, Wolo, at its option, will either repair or
replace the item free of charge, if it is returned to Wolo within three months from the date of purchase together with proof of purchase as
described below. Wolo reserves the right to inspect any defect prior to settling any warranty claim by repair or replacement. This warranty
is limited as above provided and Wolo will not be responsible for fire or other casualty or accident, due to neglect, abuse, abnormal use,
modifications, faulty installation of this product, or natural causes.
Grill mounting the LED cluster with bracket provided Fig. 4.
10. Using the LED mounting bracket as a template, position in grill and mark the mounting hole locations.
11. Drill mounting holes to size see Fig. 4
12. Mount the LED cluster to the mounting bracket using the hardware provided. Make sure that the foam
gasket is in position between the bracket and the LED cluster. See Fig. 5.
13. The mounting bracket is secured to the grill using the hardware provided. Repeat same procedure for
second bracket.
14. Connect the LED clusters female plug to the splitter wires’ male plug. IMPORTANT: First remove
protective covers from the 2 male plugs.
NOTE: The plugs can only connect in one
position. Tighten the shoulder nut fully to ensure
a good waterproof connection. See Fig. 6.
INSTALLATION IS COMPLETE
15. Position switch controller to ON.
CHANGING LIGHT PATTERN:
There are twenty-six (26) different light patterns
to choose from. Press and release the red button
on the switch controller and the light pattern will
change.
Fig. 6
Can only connect one
way. Match Notch
with Indent
Waterproof
Plug