
Product Manual


INSTALLATION INSTRUCTIONS FOR EXPANSION KIT
FOR GRILL & SURFACE MOUNT LED WARNING LIGHT
MODELS 8050-A, 8055-B, 8060-R, 8065-BR & 8070-C
12-24-VOLT
Your purchase of EXPANSION KIT is the perfect choice to increase your vehicle’s warning light’s visibility. This product is manufactured
with the finest materials and the latest technology and should only be used with Wolo’s Grill and Surface Mount, 8000 series. Each light
is tested to meet our high standards, to ensure that all functions work perfectly. Our quality workmanship and components are Wolo’s
assurance that this product will provide years of dependable service. If you need help using or installing the expansion clusters, our
technicians are available to answer your questions, Monday thru Friday, from 9 AM to 4 PM EST at
888-550-4676.
Before installation is attempted, it is important to read these instructions completely. The lives of people are dependent on the proper
installation. Note any messages marked ‘‘IMPORTANT” or ‘‘WARNING”. A safe and professional installation will prevent
serious injury or damage to the vehicle.
The two LED clusters are factory pre-wired, with waterproof plugs, for an easy professional installation that will assure reliable service
when connected to a Wolo GRILL & SURFACE MOUNT LED WARNING LIGHT.
IMPORTANT: Always de-burr any drilled holes to ensure that there are no sharp edges. Install a rubber grommet into all metal holes
that the wires are being routed through.
WARNING: The vehicle operator and/or maintenance department should
inspect the light system frequently to ensure that all clusters are functioning and
are mounted securely to the vehicle.
These installation instructions should always be kept and stored in a safe
location so that they can be referred to when information, maintenance or
reinstallation is required. Failure to follow all safety precautions and installation
procedures as outlined in these instructions, could result in property damage to
the vehicle, serious injury or death to you or others.
INSTALLATION
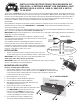
1. Route the 2 splitter wires with the male plugs and protective covers to the
locations that you plan to mount each LED cluster. (surface or grill mount). See Fig. 1.
IMPORTANT: make sure the wires will reach the desired mounting location.
Cutting any wires will void factory warranty.
IMPORTANT: Always make sure that wires are routed away from engine components and hot
surfaces to avoid damage to the warning lights wires.
MOUNTING LED CLUSTER
Surface mounting the LED cluster
2. Using the LED mounting bracket as a template, position on the desired mounting surface, and
mark the two mounting hole locations and the center wire hole. NOTE: The mounting bracket will
not be used when surface mounting LED cluster, it is being used as a template to mark the hole
locations where holes will need to be drilled.
3. Drill mounting holes to size, see Fig. 2.
4. The foam gasket is positioned behind the LED cluster.
5. Push the LED cluster wire through the drilled hole.
6. Align drilled mounting holes with the LED cluster and secure
using hardware provided. See Fig. 3.
7. Repeat same procedure for second LED cluster.
8. Connect the LED clusters female plug to the splitter wires’ male
plug. IMPORTANT: First remove protective covers
from the 2 male plugs. NOTE: The plugs can only
connect in one position. Tighten the shoulder nut fully
to ensure a good waterproof connection. See Fig. 6.
9. Secure all wiring in the engine compartment to be
safe from the exhaust manifolds and moving parts.
Mounting
Hole Size
5/32"
Wire
Hole Size
5/8"
Flat Washer
Nut
Lock Washer
Mounting Surface
Bolt
Bolt
Fig. 3 SURFACE MOUNT
Fig. 1
Splitter Wires
2 splitter wires
connected to
Warning Lights
Connect to
Expansion Pack
Warning Lights
2 splitter wires
with the male plug.
Remove protective
covers on plugs
Fig. 2