R INSTRUCTIONS VZ-7 / VZ-5N / VZ-5b English
PRECAUTIONS WARNING! RISK OF ELECTRIC SHOCK DANGEROUS VOLTAGE INSIDE This product is built according to Directive EMC and to Directive electrical equipment. Tested under VDE, ÖVE. Proofments according to UL 1950. UL ® FCC This equipment has been tested and found to comply with the limits for a Class A digital device, pursuant to Part 15 of the FCC Rules. These limits are designed to provide reasonable protection against harmful interference when the equipment is operated in a commercial environment.
9 ENGLISH 10 2 Portable Visualizer models: 1 VZ-7 7 Visualizer with remote control and serial control input RS232 VZ-5b Visualizer without remote control and serial input RS232 8 1 Video camera head 2 Light 3 Connectors (on the back as shown below) 4 Working surface 5 Power on/off switch 6 Light switch 7 Close up lens for camera 8 Pull ring 9 Auto focus on/off key (a light above this key shows that the auto focus is on) 10 Zoom keys 11 Infrared remote control 3 6 5 4 OM ZO CU FO S IRIS
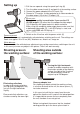
Setting up 1. Pull the arm upwards using the special pull ring (8) 2. Turn the video camera head (1) and point it at the working surface 3. Connect the power adaptor to the DC-input (14). 4. Connect a TV-monitor, a video projector or a video recorder to the video output (12) or the Y/C-output (13) Please note: The picture quality is much better if you use the Y/C (S-VHS) output (13) rather then the composite video output (12). Especially with typed material in black and white.
Infrared remote control (not included with VZ-5b) One of the unique features of WolfVision's portable Visualizers is that there are only 5 buttons on the unit. Therefore anyone can use it without any instructions. For more experienced users there are some additional functions on the remote control: ZOOM The Zoom keys are the most important keys on the IR-remote control. That is why they stand out in white color. ZOOM keys are also on the camera head of the Visualizer.
Switching to playback of a video recorder WolfVision Visualizers do not have an input switch because the following method of connecting a video recorder is much easier and requires no switching at all: Connect the video output (12) or the Y/C (S-VHS) output (13) of the Visualizer to the according input of the video recorder. Connect the video or Y/C (S-VHS) output of the video recorder with the input of your monitor or video projector.
Technical data: VZ-7 / VZ-5N / VZ-5b Pick-up element / video: Built-in camera system: 1 CCD unit - 1/3" interline transfer Effective pixels: PAL models: 752 x 582, NTSC models: 768 x 494 Horizontal resolution: > 460 TV lines Iris: Autofocus: Optics: automatic and manual (only automatic on VZ-5b) continously working with high speed, on/off switch 12 x telezoom, 5.4 - 64.8mm, f =1.8~2.7 Depth of focus (depth of field): 14mm (0.6") on smallest picture, size: 31 x 23mm (1,2" x 0.9") 18mm (0.