
Installation guide


Installation Considerations 4
Before You Start
•
Proper installation is the responsibility of the installer.
Product failure due to improper installation is not
covered under the Wolf warranty. Refer to the warming
drawer use & care guide for warranty details.
• Warranty service must be performed by a Wolf author-
ized service center. Wolf is not responsible for service
required to correct a faulty installation.
• Model WWD30 must be installed with a Wolf stainless
steel or integrated drawer front. Make sure you have
the accessory drawer front called for in your installa-
tion. Specific installation instructions are included with
the drawer front.
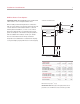
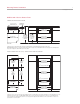
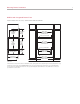
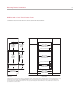
• Make sure cabinetry meets the minimum dimension
requirements for your specific installation.
• Check with local utilities for electrical codes that apply
in your area. Local codes vary. Installation, electrical
connections and grounding must comply with applica-
ble codes. In the absence of local codes, the drawer
should be installed in accordance with National Electri-
cal Code ANSI/NFPA 70-1990 or latest edition.
• This appliance must be properly grounded. Refer to
electrical requirements on page 13.
• Make sure you have the tools and materials necessary
for proper installation.
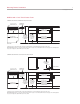
TOOLS AND MATERIALS REQUIRED
• Minimum
3
/4" (19) thick lumber for the solid platform
that supports the warming drawer—must be able to
support 200 lbs (91 kg)
• Wood screws and hardware to install the platform
• 2" x 2" or 2" x 4" lumber for anti-tip block
• Power saw
• Level
• Drill and
1
/1
6
" bit,
1
/2" bit also for integrated drawer
front application
• Phillips screwdriver
• 2 wood screws (provided)
• Wood cleats (optional)