INSTALLATION GUIDE Warming Drawer
Contents Important Note Wolf Warming Drawer . . . . . . . . . . . . . . . . . . . . . . . . . . 3 To ensure the safe and efficient use of Wolf equipment, please take note of the following types of highlighted information throughout this guide: Installation Considerations . . . . . . . . . . . . . . . . . . . . . . 4 Warming Drawer Installation . . . . . . . . . . . . . . . . . . . . 7 Service Information . . . . . . . . . . . . . . . . . . . . . . . . . . .
Wolf Warming Drawer 3 wolfappliance.com Warming Drawer Installation IMPORTANT NOTE: This installation must be completed by a qualified installer or Wolf authorized service center technician. Read this entire installation guide prior to installation and save for the local inspector’s reference. The homeowner should keep this installation guide for future reference. Any questions or problems regarding installation of the warming drawer should be directed to your Wolf dealer or Wolf Appliance, Inc.
Installation Considerations 4 Before You Start • Proper installation is the responsibility of the installer. Product failure due to improper installation is not covered under the Wolf warranty. Refer to the warming drawer use & care guide for warranty details. • Warranty service must be performed by a Wolf authorized service center. Wolf is not responsible for service required to correct a faulty installation.
Installation Considerations 5 wolfappliance.com Installation Considerations MODEL WWD30 COMBINATION INSTALLATIONS • Model WWD30 must be installed with a Wolf stainless steel or integrated drawer front. Specific installation instructions are included with the drawer front. • Model WWD30 may be installed in combination with a Wolf built-in oven and/or microwave. Additional clearance between warming drawer and oven openings may be required.
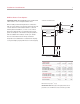
Installation Considerations 6 WWD30 Drawer Front Options IMPORTANT NOTE: Model WWD30 must be installed with a Wolf stainless steel or integrated drawer front. OVERALL DIMENSIONS A When installing a Wolf warming drawer in combination with an L Series built-in oven, Wolf recommends using the L Series drawer front with tubular handle. For all other warming drawer installations, a 1-inch or 2-inch thick drawer front with handle is recommended.
Warming Drawer Installation 7 wolfappliance.
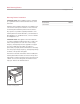
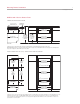
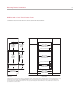
Warming Drawer Installation 8 WWD30 with Integrated Drawer Front INSTALLATION WITH 36" (914) L SERIES OVEN AND MICROWAVE 18 11/16" (475)* 19 7/8" (505)* OPENING HEIGHT TRIM HEIGHT 33 3/8" (854) MICROWAVE OPENING WIDTH E 1 7/16" (37) PLATFORM* 241/16" 24 3/8" (611) OPENING HEIGHT (619) TRIM HEIGHT 341/2" (876) L SERIES OVEN OPENING WIDTH 7/8" (22) PLATFORM 91/8" (232) 10 3/8" OPENING HEIGHT (264) 28 5/8" (727) WARMING DRAWER OPENING WIDTH E E 7/8" (22) PLATFORM 24" min (610) CABINET DE
Warming Drawer Installation 9 wolfappliance.
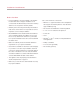
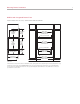
Warming Drawer Installation 10 WWD30 with 1-Inch Thick Drawer Front STANDARD INSTALLATION WITH E SERIES OVEN AND MICROWAVE 18 11/16" (475)* 19 7/8" (505)* OPENING HEIGHT TRIM HEIGHT 27 1/2" (699) MICROWAVE OPENING WIDTH 1 7/16" (37) PLATFORM* E 27 3/16" 27 7/8" (691) OPENING HEIGHT (708) TRIM HEIGHT 91/8" (232) OPENING HEIGHT 10 3/8" (264) 28 1/2" (724) E SERIES OVEN OPENING WIDTH 7/8" (22) PLATFORM E 28 5/8" (727) WARMING DRAWER OPENING WIDTH E 7/8" (22) PLATFORM 24" min (610) CABINET D
Warming Drawer Installation 11 wolfappliance.
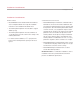
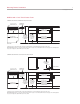
Warming Drawer Installation 12 WWD30 with 2-Inch Thick Drawer Front INSTALLATION WITH SEALED BURNER RANGETOP COOKING SURFACE 3/4" (19) 7 1/2" 8 1/2"(216) PLATFORM (191) 91/8" (232) OPENING HEIGHT 24" min (610) CABINET DEPTH SIDE VIEW 10 3/8" (264) 36" (914) STANDARD FLOOR TO COUNTERTOP HEIGHT 36" (914) RANGETOP OPENING WIDTH 3/4" (19) PLATFORM 28 5/8" (727) WARMING DRAWER OPENING WIDTH E 7/8" (22) PLATFORM 36" (914) CABINET WIDTH FRONT VIEW IMPORTANT NOTE: Unless you are using cabinets deep
Warming Drawer Installation 13 wolfappliance.com Integrated Drawer Front INSTALL RECESSED CLEATS AND PLATFORM Integrated Drawer Front For an overlay or flush inset application, you will need to install a recessed platform and cleats into the opening. Refer to the chart for specifications. Proper recess of the platform and cleats is critical to the function and esthetics of the warming drawer installation. DRAWER FRONT The depth of the platform may increase with the cabinet depth.
Warming Drawer Installation 14 Anti-Tip Block Install the Warming Drawer INSTALL ANTI-TIP BLOCKING Unpack the warming drawer on a flat surface. Remove all packaging materials from inside the warming drawer. Do not discard the package containing the two wood screws needed for installation. Install a 2" (51) x 2" (51) or 2" (51) x 4" (102) anti-tip block against the rear cabinet wall.
Service Information 15 wolfappliance.com Troubleshooting Service Information IMPORTANT NOTE: If the warming drawer does not operate properly, follow these troubleshooting steps: If service is necessary, maintain the quality built into your warming drawer by calling a Wolf authorized service center. • Verify that power is being supplied to the warming drawer. • Check electrical connections to ensure that the installation has been completed correctly.
WOLF APPLIANCE, INC. P. O. BOX 44848 MADISON, WI 53744 812542 3/ 2009 WOLFAPPLIANCE.COM 800.332.