Warming Drawer Installation Guide
WARMING DRAWER Contents 3 Warming Important Note Drawer 4 Specifications 7 Installation Troubleshooting 7 Features and specifications are subject to change at any time without notice. Visit wolfappliance.com/specs for the most up-to-date information. To ensure this product is installed and operated as safely and efficiently as possible, take note of the following types of highlighted information throughout this guide: IMPORTANT NOTE highlights information that is especially important.
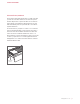
WARMING DRAWER Product Information Important product information including the model and serial number are listed on the product rating plate. The rating plate is located on the left front floor area of the inner cabinet. The drawer must be open to view the rating plate. Refer to the illustration below. If service is necessary, contact Wolf factory certified service with the model and serial number.
SPECIFICATIONS Installation Requirements Electrical The warming drawer must be installed with a Wolf drawer front, available through an authorized Wolf dealer. For local dealer information, visit the find a showroom section of our website, wolfappliance.com. Specific installation instructions are included with the drawer front. Installation must comply with all applicable electrical codes. The warming drawer can be installed in a standard or flush inset application (excludes L series drawer front).
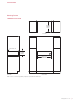
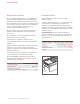
SPECIFICATIONS Warming Drawer STANDARD INSTALLATION 23" (584) OPENING DEPTH TOP VIEW ANTI-TIP BLOCK 91/8" (232) OPENING HEIGHT E 28 5/8" (727) OPENING WIDTH SIDE VIEW FRONT VIEW NOTE: Location of electrical supply within opening may require additional cabinet depth. wolfappliance.
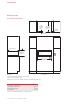
SPECIFICATIONS Warming Drawer FLUSH INSET INSTALLATION A DRAWER FRONT DEPTH 24" (610) FLUSH INSET DEPTH FINISHED CLEATS* TOP VIEW ANTI-TIP BLOCK 10 5/8" 3/4" (19) (270) FLUSH INSET HEIGHT** 3/4" (19) E 3/4" (19) 30 1/8" (765) FLUSH INSET WIDTH** SIDE VIEW FRONT VIEW *Will be visible and should be finished to match cabinetry. **Dimension provides minimum reveals. NOTE: Location of electrical supply within opening may require additional cabinet depth.
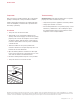
INSTALLATION Preparation Troubleshooting Remove and recycle packing materials. Do not discard the package containing two screws provided for installation. IMPORTANT NOTE: If the warming drawer does not operate properly, follow these troubleshooting steps: Install an anti-tip block against the rear cabinet wall. Verify screws are adequately secured and do not penetrate electrical wiring or plumbing. • Verify electrical power is supplied to the warming drawer.
CAJÓN CALENTADOR Contenido Aviso importante 3 Cajón Para garantizar que este producto se instale y opere de la forma más segura y eficiente posible, tome nota de los siguientes tipos de información resaltada en esta guía: calentador 4 Especificaciones 7 Instalación Resolución de problemas 7 Las características y especificaciones están sujetas a cambios sin previo aviso. Visite wolfappliance.com/specs para obtener la información más actualizada.
CAJÓN CALENTADOR Información del producto La información importante del producto, incluido el modelo y número de serie de la unidad, se encuentra en la placa de datos del producto. La placa de datos se encuentra en el área del piso frontal derecha del panel interno. El cajón debe estar abierto para ver la placa de datos. Consulte la siguiente ilustración. Si necesita servicio, póngase en contacto con el centro de servicio autorizado de Wolf y tenga a la mano el modelo y número de serie de la unidad.
ESPECIFICACIONES Requisitos de instalación Instalación eléctrica El cajón calentador debe instalarse con una parte frontal del cajón de Wolf, disponible a través de un distribuidor autorizado de Wolf. Para obtener más información acerca de los distribuidores locales, visite la sección para encontrar una sala de exposición de nuestro sitio web, wolfappliance. com. Con la parte frontal del cajón se incluyen las instrucciones de instalación específicas.
ESPECIFICACIONES Cajón calentador INSTALACIÓN ESTÁNDAR 23" (584) PROFUNDIDAD DE LA ABERTURA VISTA SUPERIOR BLOQUEO ANTIVUELCO 91/8" (232) ALTURA DE LA ABERTURA E 28 5/8" (727) ANCHO DE LA ABERTURA VISTA LATERAL VISTA FRONTAL NOTA: es posible que la ubicación del suministro eléctrico al interior de la abertura requiera de un gabinete de mayor profundidad. wolfappliance.
ESPECIFICACIONES Cajón calentador INSTALACIÓN EMPOTRABLE 24" (610) A PROFUNDIDAD PROFUNDIDAD DE LA DE LA PARTE INSTALACIÓN FRONTAL DEL EMPOTRABLE CAJÓN CORNAMUSAS TERMINADAS* VISTA SUPERIOR BLOQUEO ANTIVUELCO 10 5/8" 3/4" (19) (270) ALTURA DE LA INSTALACIÓN EMPOTRABLE** 3/4" (19) E 3/4" (19) E 30 1/8" (765) ANCHO DE LA INSTALACIÓN EMPOTRABLE** VISTA LATERAL VISTA FRONTAL *Será visible y debe tener un acabado que haga juego con los gabinetes. **La dimensión especifica los márgenes mínimos.
INSTALACIÓN Preparación Resolución de problemas Retire y recicle los materiales de embalaje. No deseche el empaque que contiene los dos tornillos para la instalación. AVISO IMPORTANTE: Si el cajón calentador no funciona correctamente, siga estos pasos para resolver los problemas: Instale un bloqueo antivuelco contra la pared posterior del gabinete. Revise que los tornillos estén asegurados de forma correcta y que no traspasen el cableado eléctrico ni la tubería.
TIROIR CHAUFFE-PLATS Table des matières Remarque importante 3 Tiroir 7 Installation Pour s’assurer que ce produit est installé et utilisé en toute sécurité et aussi efficacement que possible, prenez note des types de renseignement mis en évidence tout au long de ce guide : 7 Dépannage REMARQUE IMPORTANTE met en évidence des chauffe-plats 4 Spécifications renseignements qui sont particulièrement importants.
TIROIR CHAUFFE-PLATS Renseignements sur le produit Des renseignements importants sur le produit, y compris les numéros de modèle et de série, se trouvent sur la plaque signalétique du produit. La plaque signalétique est située sur la zone avant gauche du fond de l’armoire intérieure. Le tiroir doit être ouvert pour voir la plaque signalétique. Reportez-vous à l’illustration ci-dessous.
SPÉCIFICATIONS Exigences d’installation Électricité Le tiroir chauffe-plats doit être installé avec une façade de tiroir Wolf, offerte par les dépositaires Wolf autorisés. Pour obtenir des renseignements sur le dépositaire local, visitez la section salle d’exposition de notre site Web, wolfappliance.com. Des directives d’installation précises sont comprises avec la façade de tiroir. L’installation doit se conformer à tous les codes électriques applicables.
SPÉCIFICATIONS Tiroir chauffe-plats INSTALLATION STANDARD PROFONDEUR D’OUVERTURE DE 23 PO (584) VUE DE DESSUS BLOC ANTIBASCULEMENT HAUTEUR DE L’OUVERTURE DE 91/8 PO (232) E LARGEUR DE L’OUVERTURE DE 28 5/8 PO (727) VUE DE PROFIL VUE DE FACE REMARQUE : L’emplacement de l’alimentation électrique dans l’ouverture peut exiger une profondeur d’armoire supplémentaire. wolfappliance.
SPÉCIFICATIONS Tiroir chauffe-plats INSTALLATION À AFFLEUREMENT PROFONDEUR D’AFFLEUREMENT DE 24 PO (610) PROFONDEUR DE FAÇADE DE TIROIR A TAQUETS FINIS* VUE DE DESSUS BLOC ANTIBASCULEMENT HAUTEUR DE L’AFFLEUREMENT** DE 10 5/8 PO (270) 3/4 PO (19) 3/4 PO (19) 3/4 PO (19) E E LARGEUR DE L’AFFLEUREMENT** DE 30 1/8 PO (765) VUE DE PROFIL VUE DE FACE *Seront visibles et doivent avoir une finition correspondant à l’ébénisterie. **La dimension fournit des jeux minimums.
INSTALLATION Préparation Dépannage Retirez et recyclez les matériaux d’emballage. Ne jetez pas le paquet comprenant les deux vis fournies pour l’installation. REMARQUE IMPORTANTE : Si le tiroir chauffe-plats ne Installez un bloc antibasculement contre le mur arrière de l’armoire. Assurez-vous que les vis sont bien fixées et ne pénètrent pas les câbles électriques ou la plomberie.
WOLF APPLIANCE, INC. P.O. BOX 44848 MADISON, WI 53744 9001600 REV-A WOLFAPPLIANCE.COM 7 / 2015 800.222.