
Pro Wall Chimney Hoods IG


wolfappliance.com | 7
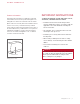
5 Remove the transition, hold-down brackets, and screws
from the packaging and use the hold-down brackets and
screws to secure the transition to the top of the hood.
Refer to the illustration below.
6 Position the mounting strip on the wall and secure it to
the wall framing with the wood screws provided. Refer to
the illustration below.
7 Lift the hood into position and insert Romex
®
wire(s) into
the electrical knockout and secure with the provided
connector.
8 Secure the hood to the mounting strip and wall structure
with the provided screws and washers.
9 Connect the ducting to the transition and secure with
duct sealing tape.
10 Reinstall the internal frame.
Installation
2 Remove the hood’s internal frame indicated by the
shaded area. Remove only the four screws indicated in
the illustration below.
3 Remove the wood mounting strip from the back of the
hood by extracting the screws from inside the hood.
4 Remove the electrical box from the inside the hood.
Refer to the illustration below.
INSTALLATION
HOLD-DOWN
BRACKET
TRANSITION
MOUNTING STRIP
16
3
/4"
(426)
Transition mounting
Hood installation
REMOVE SCREWS
ELECTRICAL
BOX
Internal frame
Electrical box