
User guide


8 21 068: MP E G-3 2 70 & 4 290 Use r Guide
© 201 3 Wohle r Te chno lo g ie s, Inc. A ll ri g ht s re ser v ed.
26
Ch apt e r 3 Ope ra ti on
F1 - F6 B u tto ns
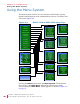
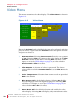
The PMT PID Screen in Figure 3–3 on page 25 shows detailed
information for the selected audio and video program map table PID.
Rotate the Volume knob to highlight the PMT PID of interest and press
it. The rotate the Volume knob and then press to select either SEL and
Exit to select that PMT PID and exit this screen and return to the MPEG
Screen, or select EXIT Only to exit this screen with no changes.
F1 - F6 Buttons
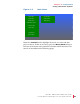
Your choice of options can be accessed directly using the function
buttons. The option or options that each button controls is set in the
Functions Menu on page 37. By default from the factory, the Function
buttons are set up as follows:
F1: By default, the F1 button will control three options: Whether
the Center marker appears, whether the Area marker appears,
and whether the Safety marker appears.
F2: By default, the F2 button will control whether the audio Level
Meters appear on the screen.
F3 - F6: By default, the F3 - F6 buttons are undefined.
Pressing the F1 through F6 buttons will light its green indicator,
showing that the option or options are in effect. Pressing the button
again removes the option or options, extinguishing the indicator.
Adjust Settings
Certain commonly accessed adjustments are accessed fairly directly by
pressing the Adjust button, lighting the green indicator in the button.
When this indicator is lit, the Volume knob is re-purposed to adjusting
the settings that follow. Pressing the Adjust button a second time exits
the menu, extinguishing the button’s indicator, as does the expiring of
the OSD Time-out set in the OSD Menu on page 41. After pressing the
IMPORTANT:
If a PMT PID row is highlighted in bright pink, this lets you know that
the stream is encripted (scrambled). This product by design is not
intended to monitor these streams, so do not attempt to select one.