
User guide

8 21 068: M P E G-3 27 0 & 4290 Use r Guide
© 20 13 Wo h ler Tec hn ol ogi e s, In c . A l l r ig h ts re se rved.
5
C hap te r 1 Installation
Fro n t P an el
page 26. Safe areas, ranging from 80% to 95%, are available from the
Marker Menu. Refer to the Marker Menu on page 35.
• Center Marker: By default the appearance of the Center Marker
is controlled by the F1 button. Refer to F1 - F6 Buttons on page 26.
• Audio Levels: By default the appearance of the Audio Level
Meters is controlled by the F2 button. Refer to F1 - F6 Buttons on
page 26. Levels for the selected audio channels can be displayed on
up to 16 meters evenly divided between the right and left sides of
the monitor screen.
• UMD: The UMD Options Menu on page 36 provides settings to
customize the UMD (Under Monitor Display) text area to show a
line of up to 16 characters.
Front Panel
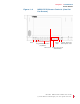
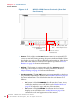
The front panel feature descriptions below refer to Figure 1–2, Figure 1–
3, Figure 1–4 on page 7, and Figure 1–5 on page 8.
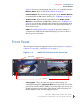
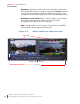
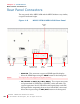
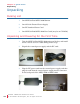
Figure 1–2 MPEG-3270 Front Panel Overview
• Tally Lights: These tri-color (red/green/amber) lights are
controlled through the Tally and GPI connector on the rear of the
panel. Note that the MPEG-3270 has two tally lights per screen, one
on the left and one on the right. These lights work in tandem. The
MPEG-4290 has only one tally light per screen.
Tally Lights
Headphone Jack
Speakers
USB Port