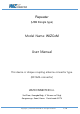
Repeater (USB Dongle type) Model Name: WIZCoM User Manual This device is Unique coupling antenna connector type. (RP-SMA connector) WIZCONNECTED Inc. 2nd Floor, Seongbo Bldg., 8 Teheran-ro 104gil Gangnam-gu, Seoul, Korea Postal code 06174 Copyright ⓒ 2019 Wizconnected Inc. All rights reserved.
Contents 1. General……..…………………………………………………………..………….……........3 2. Program execution……… ………………………..…………………………………………4 3. Repeater connection……….…....……………………………………….………..……..… 5 4. Counter registration………………………………………………………………..……..…..5 5. System...……….………………………….……………………………..…………..………..7 6. Status……………….………………………….…………………………………..….….…..13 7. Management………………………………………………………………………………….15 8. Drawing……….………………………………………………………………….…...………16 9. Installation……………………………………………………………………...........…........17 10.
1. General The repeater (USB Dongle) receives the production quantity every set time from the mold counter that is mounted on the injection molding machine. The repeater connects to an industrial PC and uses the information received from the mold counter to enable production counting, production management, mold asset management, and mold quality control by the Smart Mold Management System.
I/O USB 2.0, Ethenet 2. Program Execution ① Connect the repeater with USB port of the industrial PC. ② Run “Explore” or “Chrome” and enter 127.0.01:8080 in the address bar. ③ Click “SIGN IN” after enter “ID” and “PASSWORD”. Copyright ⓒ 2019 Wizconnected Inc. All rights reserved.
3. Repeater Connection ① Check the com port in the path “My computer” “Management” “Device Manager””Port”. ② Select “System” “Repeater” menu and select the com port and click the start button. ③ Click the check ch. ④ The channel of the repeater is displayed as "CHX" at the bottom of the screen. 4. Counter Registration 1) Add ① Select “System” “Counter” Menu. ② Click the add button. Copyright ⓒ 2019 Wizconnected Inc. All rights reserved.
③ Press the mode button for more than 2seconds while the active switch is pressed by finger. ④ ⑤ ⑥ ⑦ ④ When the counter ID is displayed as “ConXXX” on the LCD screen, press the mode button shortly and move to “LEAVE”. ⑤ When the “LEAVE” is displayed in the LCD screen, press the mode button twice shortly to select it. “LEAVE” does not blink if “LEAVE” is selected correctly. If it blinks, select again.
2) Changing “Shot count” and “Transmission cycle” ① Select “System”“Counter” menu. ② Select a counter to change from the counter list and enter “Shot count” in the text box, and select “Transmission cycle”. The transmission cycle is initially set to one hour, and it can be changed in the counter menu. ③ Click “Set Device” button. 5. System 1) System > Code > Administrator ① Select “System” “Code” and select “Administrator” at a search filter of “Group Name”.
3) System > Code > Department ① This menu is to set the department. 4) System > Code > Location ① This menu is to set the location of mold. ② If you replace the mold with another one or store the mold in the warehouse, you must enter the location. Copyright ⓒ 2019 Wizconnected Inc. All rights reserved.
5) System > Code > Manufacturer This menu is to set the name of mold manufacturer. 6) System > Code > Material This menu is to set the material of resin. Copyright ⓒ 2019 Wizconnected Inc. All rights reserved.
7) System > Code > Period Classification This menu is to set for searching target production by period. 8) System > Code > Search Classification This menu is to set for searching the production volume by period. Copyright ⓒ 2019 Wizconnected Inc. All rights reserved.
9) System > Code > Transmission Cycle ① This menu is to set the transmission cycle to send the shot count of mold to the repeater. 10) System > Product ① This menu is to set the product number and product name. 11) System > User ① This menu is to set the user ID, user name, password and select the department. Copyright ⓒ 2019 Wizconnected Inc. All rights reserved.
) System > Counter ① This menu is to set the user ID, user name, password and select the department. ② When the mold counter has problem or the battery is replaced, select the corresponding mold counter from the table and enter the current shot count in "Shot count" text box. 6. Status 1) Production Copyright ⓒ 2019 Wizconnected Inc. All rights reserved.
① This menu is to search the product status. ② Place the cursor in the “Mold No” and press the enter key. ③ Select a mold number or mold name in pop up menu. ④ Select the period at search classification filter. ⑤ Click “Search” button. ⑥ Select the mold name or mold number to search the production status. ⑦ If you click the mouse on the right of position “⑦”, an arrow appears like “ ⑧”and you can Sort by date. ⑧ Click the icon to import Excel data. ⑦ ⑧ Copyright ⓒ 2019 Wizconnected Inc.
2) RealTime ① This menu shows the product name, product yield, mold counter id, mold guarantee quantity, and battery status of the counter in real time. ② This menu is refreshed every 10minutes. ③ Click on the displayed product name to see the “Unit per Hour”, “Performance”, “Guarantee Ratio” and “Actual”. 7. Management Copyright ⓒ 2019 Wizconnected Inc. All rights reserved.
1) Mold ① Click “New” button, ② Enter the mold name, Cavity, guarantee Qty and Target Qty. ③ Select the location of mold, customer, manufacturer, material, period classification and user. ④ Click “Save” button. 8. Drawing Copyright ⓒ 2019 Wizconnected Inc. All rights reserved.
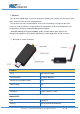
Repeater Connector: SMA-Male The connector type of the repeater is SMA male. Antenna Antenna connector type is SMA female. 9. Installation ① Plug the repeater into an industrial PC and attach it to the wall using the Velcro tape Copyright ⓒ 2019 Wizconnected Inc. All rights reserved.
on the wall at an angle of up to 10 degrees from the height where the mold counter is mounted on injection machine. ② The antenna should be fixed downward with the wall to be 30° ~ 45°. In the field, the distance between the repeater and the mold counter should be measured to determine the appropriate height, position, and antenna angle. ③ Plug the Ethernet cable into the industrial pc. Copyright ⓒ 2019 Wizconnected Inc. All rights reserved.
9. Federal Communications Commission(FCC) Interference Statement FCC Statement This device complies with part 15 of the FCC rules. Operation is subject to the following two conditions: (1) This device may not cause harmful interference, and (2) This device must accept any interference received, including interference that may cause undesired operation. There is one statement for this product: The device must carry a label stating "FCC ID: 2ATP8WIZCOM”.