
User Manual


15
Learning to Scan
Step 3. Switch to Left-Handed Scanning (Optional)
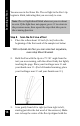
If you are left-handed, adjust the Pen for left-handed
scanning:
1. Scroll to the Preferences menu using 4 or 5, then
press 2.
2. Scroll to the Right-/Left-Handed option, then press
2.
3. With the Left-Handed option displayed, press 2.
The text changes position on the Pen display.
4. Switch the Pen to your left hand.
5. Press 3 to return to the Main Menu.
Note: Scanning instructions are the same for left-handed
users.
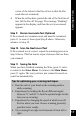
Step 4. Select the Notes Application
Scroll to Notes using 4 or 5, then press 2.
Step 5. Select the New File Option
The New File option is highlighted. Press 2 to select this
option.
Note: If New File is not highlighted, scroll to New File
using
4
or
5
, then press
2
.
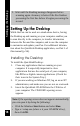
Step 6. Remove the Protective Cover from the Pen
Remove the protective cover from the tip of the Pen.
Step 7. Assign a File Name
The new Notes file is assigned a name automatically. Press
5 to scroll to OK, then press 2 to accept the file name. A
blinking cursor appears in the Pen display.