
User manual


Getting Started
5
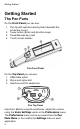
On the Back Panel you can see the battery compartment.
Pen Back Panel
Unpacking the Pen
To get started:
1. Remove the Pen from the protective case.
2. Lift the battery cover on the back of the Pen by pushing
the tab down and out.
3. Insert the batteries into the Pen with the positive and
negative terminals corresponding to the markings on the
sides of the battery compartment.
4. Close the battery compartment.
5. Remove the protective cover from the Pen tip.
6. Turn the Pen on by pressing the red power key.
The Pen is ready to scan!
Note: Make sure that your Pen always contains batteries,
even when connected to the PC.
Installing the PenExplorer
Use the PenExplorer to download files to your Pen and to
extract the list of recently viewed words from the Pen.
Important: Do not connect the USB cable to the PC before
installing the PenExplorer.
To install the PenExplorer do the following:
1. Insert the CD-ROM that was supplied with the Pen. The
CD-ROM Main Menu appears on the PC screen.
2. Click on the PenExplorer Installation and follow the
instructions for installing the PenExplorer and the USB
driver.