ReadingPen®TS Oxford User Manual
Table of Contents Table of Contents Introduction ......................................................................... 3 Contact and Support Information .................................... 3 Getting Started .................................................................... 4 The Pen Parts.................................................................. 4 Unpacking the Pen .......................................................... 5 Installing the PenExplorer ........................................
Table of Contents The PenExplorer ............................................................... 45 Opening the PenExplorer .............................................. 45 PenExplorer Properties Window .................................... 46 Taskbar Icon and Menu ................................................. 46 The Notes Folder ........................................................... 47 PenExplorer Functions .................................................. 47 History Retrieval .................
Introduction Introduction Congratulations on your choice of a state-of-the-art scanning Pen from WizCom Technologies. WizCom makes personal, portable scanning Pens that assist with reading, understanding and utilising text. Inside the tip of the Pen is a sophisticated electronic eye. This eye enables you to scan different types of printed information directly into your Pen. Use the Pen to scan full lines of text, receive word-by-word definitions, and hear scanned words pronounced aloud.
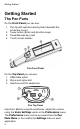
Getting Started Getting Started The Pen Parts On the Front Panel you can see: 1. Pen tip with optical scanning head (beneath the protective cover) 2. 5-way button (Enter and direction keys) 3. Power/Escape key (red) 4. Touch screen display Pen Front Panel On the Top Panel you can see: 1. USB cable outlet 2. Stylus and stylus slot 3. Insertion point for earphones Pen Top Panel Important: Before using the earphones, adjust the volume using the Voice Settings option in the Preferences menu.
Getting Started On the Back Panel you can see the battery compartment. Pen Back Panel Unpacking the Pen To get started: 1. Remove the Pen from the protective case. 2. Lift the battery cover on the back of the Pen by pushing the tab down and out. 3. Insert the batteries into the Pen with the positive and negative terminals corresponding to the markings on the sides of the battery compartment. 4. Close the battery compartment. 5. Remove the protective cover from the Pen tip. 6.
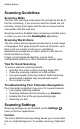
Getting Started Scanning Guidelines Scanning Mode The Pen is in scanning mode when the red light at the tip of the Pen is blinking. If you scan text and the results are not accurate, simply scan again and the text on screen will be over-written with the new text. Scanning mode is disabled when accessing a toolbar menu or when you are not in the ReadingPen application.
Getting Started on a dark background, select the Inverse option in the Settings menu. Changing the Font Size There are two font sizes to choose from – Regular and Enlarged. Changing the font size will mainly affect how text is seen in the File Screen and the Dictionary Screen. Change the font size by selecting or de-selecting the Enlarged Font option in the Settings menu of the application. Note: The default application setting is Enlarged Font.
Getting Started CAUTION: To reduce the risk of electrical shock or damage to the internal components, do not spray liquid directly on the screen or allow excess liquid to drip inside your Pen. The Pen Power Supply The Pen comes with 2 AAA Alkaline batteries. Safety Points (Batteries) Always place 2 fresh batteries in the Pen. It is not advisable to use the Pen with batteries that are not at the same voltage level. Do not combine different types of batteries (e.g. rechargeable and non-rechargeable).
The Pen User Interface The Pen User Interface The Pen Keys 1. Power/Escape Key (red key) Power: Start up – Short press to turn the Pen on Shut down - Long press to turn the Pen off Note: To turn the Pen off, hold down the Power key until the progress bar reaches the end. Escape (ESC): Activate/deactivate toolbar Close submenus and pop-ups Stop reading/spelling aloud Dictionary Screen: Disable highlight mode 2.
The Pen User Interface 2. Left key – Scroll left Dictionary Screen: Toggle dictionary views (complete/abridged forms) Word Screen: Toggle syllable and regular view 3. Up key – Scroll up 4. Down key – Scroll down Word Screen: Access dictionary definition Icons and Indicators The following table contains a list of icons and graphic indicators. Icons can be selected by tapping on them with the stylus, or can be accessed with the 5-way button. Indicators cannot be selected.
The Pen User Interface Graphic Function ReadingPen Icons in the Word Screen Down arrow: Access dictionary definition. Left arrow: Divide word into syllables. Toggle syllable and regular view. Right arrow: Spell word aloud. Inactive arrows: The function is unavailable The Games Toolbar Move to Next Word: Clear the current screen and move to the next mystery word. Show Score: View the amount of correct answers for the selected game.
Tutorials Tutorials Tutorial 1: Learning to Scan (with the Trainer) This tutorial will help you learn to scan using the Trainer supplied in the package. 1. Slide the Trainer onto the tip of the Pen (instead of the cap) and press into place. 2. Press the red Power key to turn the Pen on. Select the ReadingPen icon from the Pen Main Menu by tapping on it with the stylus or by using the direction keys. If you are using the Pen for the first time you will be asked to select a dictionary.
Tutorials Tutorial 2: Editing and Entering Text Use the Virtual Keyboard to enter or edit text with the stylus. To access the Virtual Keyboard select from the application toolbar. The Virtual Keyboard The Editing Area This is the insertion point for new text, as indicated by the blinking cursor. Use the stylus to enter or edit text with the character keys, or scan text directly into the editing area. Scanned text is underlined. Tapping any key other than or will accept the inserted text.
Tutorials Note: The auto complete list only contains words from the selected dictionary. The Keyboard The keyboard layout corresponds to the selected scanning language settings. The Keys: Key or ESC or Enter 14 Function Backspace: Tap to delete characters to the left of the cursor. Close and Cancel: Tap to reject all changes and return to the application screen. Close and Save: Tap to accept all changes and return to the application screen. Shift: Tap to switch to uppercase characters.
Tutorials Tutorial 3: Learning a Word Use this tutorial to learn how to access the ReadingPen features after scanning or entering a single word. 1. Access the Input Screen a. Press the red ESC key to turn the Pen on. b. From the Pen Main Menu, enter the ReadingPen application: • By pressing ENT when the icon is highlighted. • By tapping on the icon with the stylus. The Input Screen will appear: 2. Scan or enter the word you wish to learn You can either scan a word or enter it using the Virtual Keyboard.
Tutorials The Word Screen will appear and the word will be read aloud. Note: If you have not changed the default Pen settings you will hear the word read aloud. Press ENT or tap on the icon to hear it read aloud again. 3. Hear the word spelled out Use the right direction key or tap on the icon to hear the word spelled out. Each letter will be highlighted as it is spoken. 4. View the syllabic division of the word Use the left direction key or tap on the syllabic division of the word.
Tutorials 5. View the English definition of the word a. Use the down direction key or tap on the icon to view the English dictionary definition of the word in the Dictionary Screen. b. Use the up/down direction keys to scroll through the dictionary definitions. c. Use the right/left direction keys to switch between complete and abridged dictionary entries. icon is seen on the screen: Use the • When the right direction key or tap on the icon to view the complete dictionary entry.
Tutorials d. Tap on the icon to return to the Word Screen. The original word, “reading” will appear on screen. 7. Activate highlight mode a. Tap on the icon to reach the Dictionary Screen. b. Press the ENT key to activate highlight mode. The first word or number of the first will be highlighted. 8. Hear the sections read aloud a. Tap on the icon to hear the whole section read aloud, word by word. Each word will be highlighted as it is spoken.
Tutorials b. Press ENT. c. The Word Screen will appear showing the crossreferenced word. d. View the syllable breaks and hear the word spelled aloud as explained in points 3 and 4. e. View the dictionary definition as explained in point 5. f. Tap on the icon to return to the original word you cross-referenced from. The word “something” will be highlighted on screen.
Tutorials Tutorial 4: Learning a Line of Text Use this tutorial to learn how to access the ReadingPen features after scanning or entering a line of text. Most of the features are the same as those described in tutorial 3. 1. Access the Input Screen a. Press the red ESC key to turn the Pen on. b. From the Pen Main Menu, enter the ReadingPen application: • By pressing ENT when the icon is highlighted. • By tapping on the icon with the stylus. The Input Screen appears: 2.
Tutorials Note: If you have not changed the default Pen settings you will hear the sentence read aloud. Tap on the icon to hear it read aloud again. 3. Hear each word read aloud Use the left/right direction keys to scroll through the sentence on screen or tap on the word you wish to hear read aloud. Each word is highlighted as it is spoken. 4. View a word in the Word Screen a.
Tutorials Tutorial 5: Using Files Use this tutorial to learn how to access the ReadingPen features after downloading a file to the Pen. 1. Creating a File in Notepad a. On your PC go to Start\Programs\Accessories and select the Notepad application. b. A Notepad window will open on screen. c. Type the following text into the Notepad window: This tutorial will teach me how to use files on the Pen. I will be able to hear text read aloud, broken down into syllables and spelled aloud.
Tutorials b. From the Pen Main Menu, select Connect to PC: • By pressing ENT when the icon is highlighted. • By tapping on the icon with the stylus. c. The WizCom PenExplorer window will open and will be seen in the notification area of the the icon windows taskbar. d. Double-click on the Notes folder to open it. e. Copy the “Document.txt” file you created in step 1 from your PC Desktop to the Notes folder. f. Press the red ESC key on the Pen to exit the PenExplorer and return to the Pen Main Menu.
Tutorials 3. Working with Files on the Pen a. From the Pen Main Menu, enter the ReadingPen application. b. Tap on the (File Operations) icon and select Open File from the drop-down menu. c. The file list will open on screen. d. Select the file “Document” by either pressing ENT or tapping on the file name with the stylus. e. The file will open in the File Screen. f. Tap on the icon with the stylus. The paragraph will be read aloud, with each word highlighted as it is read. 4.
Tutorials d. Scroll to the word “tutorial” and press ENT. e. The Word Screen will appear. See steps 3 – 11 in tutorial 3 to learn about the Word Screen functions. g. From the Word Screen, tap on the icon to return to the Text Screen. h. The sentence from the file will re-appear in the Text Screen. Tap on the icon to return to the File Screen. 5. Viewing a single word from the file a. Tap on the (Settings) icon and select Show Sentence/Word from File from the drop-down menu. b.
The Pen Main Menu The Pen Main Menu To access the Pen Main Menu, exit the application you are from the application toolbar. currently using by selecting The following items appear in the Pen Main Menu: ReadingPen (see page 26) Games (see page 42) Connect to PC Preferences Information Connect to PC Use this option to transfer files to your Pen and to retrieve a list of the last 80 viewed words from the ReadingPen application. See the PenExplorer section on page 45 for more information.
The Pen Main Menu Set Auto Shut-Off Time If the Pen is on but is not being used, it will shut down automatically after two minutes. Use this option to change the default time setting. Settings range from 1min – 15min. Set Right–/Left– Handed Use this option to switch between right and left-handed scanning. The Pen default is set to right-handed scanning. Set Screen Contrast Use this option to adjust the brightness of the display.
The ReadingPen Application The ReadingPen Application The Toolbar The toolbar appears on the top right corner of the screen. It can be accessed using either the stylus or the Pen keys. Accessing the Toolbar 1. Using the Stylus Tap the icon to open the toolbar item. Within the menu option, tap with the stylus to select an option or scroll up/down using the scrollbar icons. To de-select the toolbar, simply tap in a space outside the menu or toolbar. 2.
The ReadingPen Application Read Aloud Hear text read aloud in all screens. Use the Voice Settings option in the Preferences menu to define speaker settings. File Operations Use this menu to open or delete files downloaded to the Pen using the PenExplorer. Alternative Entries View a list of alternative dictionary entries for the selected word. This menu item is inactivated if there are no alternative entries available for the selected word. History View a list of the last 80 looked-up words.
The ReadingPen Application Menu Option Function Inverse The Pen is set to scan dark text on a light background. Select this option to scan inverse text (white text on dark background). Choose how text is read aloud when activating the speaker in a file or dictionary entry. If Paragraph to hear the entire section read aloud. Select Word to hear only the highlighted word read aloud. This setting defines what happens when extracting text from a file.
The ReadingPen Application Help The Help menu contains the following options: Menu Option Function Pronunciation Guide A guide to the pronunciation of words using the phonetics alphabet and symbols. A guide to the abbreviations used in some dictionaries. Abbreviations Guide Icons… Keys… An explanation of the icons and graphic indicators seen on the Pen screens. An explanation of the Pen keys and their functions. Note: Only relevant icons and menu options will be available in each screen.
The ReadingPen Application ReadingPen Screen Functions The ReadingPen application has several different screens, each with different functions. Text can be scanned into any screen when the red light at the tip of the Pen is blinking. Any text that has already been scanned will be over-written by the new text. The last 80 words that you look up are saved into the History list which can be opened in any screen where the icon appears in the toolbar.
The ReadingPen Application File Screen The File Screen appears when opening a file using the File Operations ( ) menu. Scroll through the text using the up/down direction keys or by tapping on the scroll arrows at the bottom-right of the screen with the stylus. Select to return to the Input Screen. Downloading Files to the Pen Download files to the Pen using the PenExplorer. See The PenExplorer on page 45. File Screen Functions 1.
The ReadingPen Application Text Screen The Text Screen appears after scanning or entering more than one word, or when selecting a word from a file when the file setting is Show Sentence from File. Text Screen Functions 1. Hear text read aloud Tap on the icon to hear the entire sentence read aloud. Each word is highlighted as it is read. The default reading settings are Always Read Aloud and Highlight Spoken Words. Change these settings by de-selecting the options in the Settings ( ) menu.
The ReadingPen Application Word Screen Functions 1. Hear the word read aloud Tap on the aloud. icon or press ENT to hear the word read 2. Spell the word aloud Tap on the icon or press the right direction key to hear the word spelled aloud. Press ESC to cancel. 3. View the syllabic division of the word Tap on the icon or press the left direction key to view the syllabic division of the word.
The ReadingPen Application Dictionary Screen Functions 1. Hear the current word read aloud Tap on the icon to hear the word read aloud. Note: If highlight mode is activated (one of the words in the entry appears highlighted), press ESC to deactivate the highlight mode. 2. Hear sections of text read aloud This function is only available for dictionaries which contain voice support. To hear sections of dictionary entries read aloud: a. Scroll to the section you wish to hear read aloud. b.
The ReadingPen Application indicates that the view is complete. Tap on the icon to switch to abridged view. 4. View Alternative Entries If the word you are accessing has more than one definition the icon will appear in the toolbar. If the current word has no alternative entries, the indicator will appear. Tap on the icon to open the word list. Select the option you want to view and it will appear in the Dictionary Screen. 5.
The ReadingPen Application Dictionary Entries The dictionary entries contain various elements. 1. Headword The selected word or derivative of the selected word. Includes headwords made up of more than one word. The headword ‘hello’ The compound headword 'cross-country skiing' 2. Homonyms Two or more words which are spelled the same but have different meanings. The Alternative Entries list for the homonym ‘desert’ 3.
The ReadingPen Application For a guide to the phonetic symbols used in the dictionary, select Pronunciation Guide from the Help menu. 4. Definitions If the headword has more than one definition for a particular part of speech, each definition is numbered, with the most common definition appearing first. Definitions of the verb form of the headword 'try' 5. Parts of Speech Categories of words that describe their specific grammatical function, e.g. nouns, verbs and adjectives.
The ReadingPen Application The idiom ‘from A to Z’ from the headword ‘from’ The Alternative Entries list for ‘from A to Z’ includes the complete idiom and the first word of the idiom 7. Alternative Spelling of Headwords If the headword can be spelled in more than one way, the alternative spelling is shown beside the headword.
The ReadingPen Application 4. The password screen will appear. Use the stylus to enter a four-number password. Press ENT or key to save the password. tap on the 5. Write down your password. If you have chosen one of the options that lock dictionary access, the indicator will appear in all relevant screens. Locking dictionary access will also lock the dictionaries in the Games application. Definitions will not be available until the dictionary is unlocked. 2.
Games Games Select this option to access the Games. The games use words derived from the ReadingPen History list to help you practice words you have looked up. If you don’t have enough words in your History list, additional words will be added to the word list from the selected dictionary. If you have locked dictionary access in the ReadingPen application, you will not be able to access the definitions of the words being played. Definitions will only be available when dictionary access is unlocked.
Games where you wish to place the letter. You can move letters into, around and out of the box as many times as you wish. Wordman Guess the mystery word by tapping on letters from the keyboard with the stylus. If you guess a correct letter, it will appear in the matching space in the answer section above the keyboard. Guessing a letter which does not appear in the word will cause a body part to be added to the Wordman.
Games Settings The Settings menu contains the following options: Menu Option Function Enlarged Font Use this option to switch between regular and enlarged display font. The Pen’s default setting is enlarged font. Choose the dictionary you wish to use with the game. Only appears if there is more than one dictionary n the Pen whose source language is English. Clear the score for the current game and start from zero.
The PenExplorer The PenExplorer The PenExplorer is the application your Pen uses to communicate with the PC. Use the PenExplorer for: 1. History retrieval: Upload the list of recently viewed words from the ReadingPen application to the PC. 2. File management: Copy files onto the Pen for use in the ReadingPen application. 3. Compacting flash memory: Compact the Pen flash card. Installing the PenExplorer and USB driver Install the PenExplorer from the CD you received with the Pen.
The PenExplorer PenExplorer Properties Window Right-click on a space in the main PenExplorer window and select Properties from the drop-down menu. This will open the WizCom PenExplorer Properties window. The PenExplorer Properties window has two tabs: 1. General: Shows the Pen’s memory status and gives you the option to compact the flash card memory. 2. About: Displays version and copyright information for the PenExplorer.
The PenExplorer The Notes Folder The Notes folder contains all files copied to the Pen. It also contains the History.txt file which contains a list of the last 80 words looked up in the ReadingPen application on the Pen. Double-click on the Notes folder in the PenExplorer window to open the folder. Double click on a file to open the file in Notepad. PenExplorer Functions History Retrieval The History.
The PenExplorer 2. Saving Files in the Correct Format Files must be saved as plain text files and in UNICODE. From Word: 1. Go to File\Save As. Insert a file name. 2. Change the file type to Plain Text (*.txt) and click the Save button. 3. The File Conversion dialog box appears. Select Other encoding. Scroll through the list and select Unicode. 4. Click the OK button. From Notepad: 1. Go to File\Save As. Insert a file name. 2. Make sure file type is Text Documents (*.txt). 3.
The PenExplorer 3. Copying Files to and from the Pen The PenExplorer/Notes folder works like standard Windows folders. Copy files to and from the Notes folder using standard Windows functions, such as dragand-drop, copy-paste and using the PC shortcut keys. Click on a file in the Notes window to highlight it. Rightclick to open the drop-down menu and select the function you wish to use. Compacting Flash Memory The Pen’s flash memory is used to store Pen files.
The PenExplorer Troubleshooting This troubleshooter deals with some potential Pen-PC connectivity issues. Issues: 1. The Pen says that it is connected to the PC but the PenExplorer window hasn’t opened on screen and I can’t see the icon in the taskbar. 2. I receive the “Error connecting to PC” message on the Pen but I have followed all the tips and the PenExplorer should be working correctly. Solutions: Try the following options, in this order: 1. Disconnect the USB cable from the Pen.
The PenExplorer c. Click on the End Process button. d. Click Yes on the Task Manager Warning (XP) or End Process in the Windows Task Manager confirmation message (Vista). e. Go to C:\Program Files (or the equivalent in Vista) and open the WizCom Technologies Ltd folder. Open the WizCom PenExplorer folder and look for the PenService.exe file. f. Double-click on the PenService.exe file to reactivate the PenExplorer. If the Windows Task Manager is still open, you will see PenService.
Product Specification Product Specification Pen Specification Feature Display Type Keypad CPU Memory SRAM ROM/RAM Optical Scanner Communications IRDA, 115,200 bps USB1.1 Power Internal Power External Power Current Consumption Size Weight Safety Operating Temperature Range Description Touch Screen Monochromatic FSTN Resolution: 208 x 65 Size: 61mm x 20mm / 2.4” x .
Copyrights and Trademarks Copyrights and Trademarks © 2009 WizCom Technologies Ltd. All rights reserved. WizCom Technologies Ltd. uses the Ligature OCR-on-a-Chip copyright © 1995-2009, Ligature Compression Technology copyright © 1996-2009, and Ligature reverse inflection and derivation technology copyright © 1997-2009 under license from Ligature Ltd. All rights reserved.
Worldwide Limited Warranty (iv) WizCom has been advised in writing by the PURCHASER of the alleged defect or malfunction of the Product within fourteen (14) days after the expiration of the applicable limited warranty period. (v) This limited warranty does not cover physical damage to the surface of the product, including breakage, cracks or scratches on the LCD screen or outside casing.