Table of Contents Familiarizing Yourself with the Pen.................................................... 3 The Pen Buttons (keypad)............................................................. 4 Scanning ....................................................................................... 5 What is on the Pen ........................................................................ 9 The Notes application................................................................ 9 The Scan to PC application ........
Copyrights and Trademarks © 2006 WizCom Technologies Ltd. All rights reserved. WizCom Technologies Ltd. uses the Ligature OCR-on-a-Chip copyright © 1995-2006, Ligature Compression Technology copyright © 1996-2006, and Ligature reverse inflection and derivation technology copyright © 1997-2006 under license from Ligature Ltd. All rights reserved.
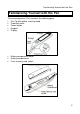
Familiarizing Yourself with the Pen Familiarizing Yourself with the Pen The scanning device (‘Pen’) contains the following parts: • Pen Tip with optical scanning head • Protective cover • Power button • Keypad • Display • • • Battery compartment cover Battery compartment Flash memory card socket 3
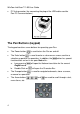
WizCom InfoScan™ 1.00 User Guide • PC link connector (for connecting the plug of the USB cable used for Pen-PC Communications). The Pen Buttons (keypad) The keypad contains seven buttons for operating your Pen: • The Power button • is used to enter a sub menu or screen, confirm a The Enter button selection or perform an operation. In addition, the button has special functionalities on text in an open Notes file: will open the Hebrew translation for the current a. Long pressing English word. b.
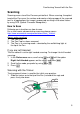
Familiarizing Yourself with the Pen Scanning Scanning means to roll the Pen over printed text. When scanning, the optical head of the Pen scans the surface and creates a bitmap copy of the scanned text. In all applications the image is processed resulting in the actual letters by using OCR (Optical Character Recognition). How to Scan Following are instructions on how to scan. For a short movie, demonstrating scanning, please access http://www.wizcomtech.com/presentations/main_18.html.
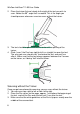
WizCom InfoScan™ 1.00 User Guide 2. Place the trainer flat and steady to the right of the text you wish to scan. Notice the 90˚ angle that is created. This is the angle you should preserve whenever scanning, even without the trainer. 3. The text should be positioned at the center of the opening of the trainer. 4. Glide (‘scan’) the Pen from right to left in a straight line over the text. The area you scan should start 1cm before the text, and end 1cm after it.
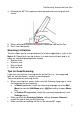
Familiarizing Yourself with the Pen 4. Maintain the 90˚ Pen angle you have learned when scanning with the trainer. 5. When rolling over the text, do not press down too hard on the Pen. 6. Don’t scan too quickly.
WizCom InfoScan™ 1.00 User Guide • • • • Place the book/page on a flat surface. The page must be light while the text or image you scan must be dark. Make sure the printout is of good quality and the page is not creased. Note that poorly photocopied materials may provide bad results. Do not scan too fast. Editing Text (without Scanning) In addition to scanning, the Character Bar can be used as input method – that do not involve scanning.
Familiarizing Yourself with the Pen 3. Press or to scroll along the Character Bar. As you move from character to character, each character is highlighted and appears in the string of text. 4. Press to select the highlighted character. The character is entered into the text string (the character is inserted – when in insert mode, or the character overwrites the highlighted character – when in overwrite mode). 5. If you are in Multiple Character mode ( ), you can add additional characters.
WizCom InfoScan™ 1.00 User Guide Set Up Product on PC To allow Pen-PC communications (for transferring data from the Pen to the PC), you must set up your PC. The set up procedure on the CD-ROM will install the USB driver, install the WizCom InfoScan Desktop application and establish the Pen-PC communications. To run the set up procedure: 1. Insert the WizCom InfoScan CD-ROM into the CD-ROM drive of your computer. 2. The Main Menu appears.
Tutorials Tutorials The following are tutorials to help you learn the basics of the WizCom InfoScan™: Tutorial 1 – Notes Tutorial 2 – QuickLink Tutorial 3 – Scan to PC Important: Please refer to How to Scan on page 5 for additional information on scanning. Tutorial 1 – Notes This tutorial will take you through the basic usage of the Notes application on the Pen. Step 1: Turn the Pen on Remove the protective cover from the Pen & press to turn the Pen on.
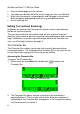
WizCom InfoScan™ 1.00 User Guide The Pen display will show: The list of Scanning Languages with English marked 5. Press to activate the selection. Your Pen is now set to scan English printed text. 6. Press Menu. until you are back at the beginning of the Pen Main The Pen display will show: The Pen Main Menu Step 3: Start the Notes application Press to activate the current option and enter the Notes application.
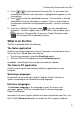
Tutorials 4. Press to activate the highlighted button. The Pen display will show: A file, open and ready for editing, in the Notes screen A new file named note001* is created, opened and ready for editing. *Note: if you have already used this application the file name will contain a different suffix (e.g., note004). Step 5: Scan a sentence into the open file Following is a sentence spread over 2 lines: Roll the scanning device over printed words and see how the words appear on your Pen.
WizCom InfoScan™ 1.00 User Guide Step 6: Scroll to a scanned word you wish to translate At this point you could do any of the following: • Scan more text. It will be added after the text you have already scanned. • Create a new paragraph by pressing .A new paragraph will open below a division line (that appears after the previously scanned text). You can now scan text into the new paragraph.
Tutorials Step 8: Return to the open file Press to return to the open file. The Pen display will show: The cursor is still in the word ‘device’ At this point you can continue to do any of the following: • Scroll through the words of the scanned text and translate any of them (long press ). • Open new paragraphs by pressing • Place the cursor at any point where you would like to scan in new text – and just scan. at the end of the scanned text.
WizCom InfoScan™ 1.00 User Guide Tutorial 2 – QuickLink This tutorial will take you through the basic usage of the QuickLink function which involves Pen-PC Communications. Important: Before performing this tutorial, you must have already run the one time procedure Set Up Product on PC from the WizCom InfoScan™ CDROM (see Set Up Product on PC on page 10). Step 1: Prepare the PC 1. Turn your PC on. 2. Close any applications that are running on your computer.
Tutorials 2. Press until the option QuickLink appears on the screen. The Pen display will show: The Pen Main Menu Step 3: QuickLink the Notes Files to the Desktop Application 1. Press to activate the QuickLink function. The Pen display will show: If First Time: If this is the first time you have ever performed a QuickLink, you will see the following dialog on the PC: 2. Press Next.
WizCom InfoScan™ 1.00 User Guide 3. Press Finish.
Tutorials When the QuickLink is completed 4. Press OK. Step 4: View the Sent Notes File in the Desktop Application In the left pane of the Desktop application window, click on the Notes icon: The Notes icon in the Desktop left pane Notes in the Desktop application The Desktop will open the Notes application and display its list of files, in the middle pane and its current file, in the right pane. This is the file you scanned in tutorial 1.
WizCom InfoScan™ 1.00 User Guide Tutorial 3 – Scan to PC This tutorial will take you through the basic usage of the Scan to PC application which involves Pen-PC Communications. Important: Before performing this tutorial, you must have already run the one time procedure Set Up Product on PC from the WizCom InfoScan™ CDROM (see Set Up Product on PC on page 10). Step 1: Prepare the PC 1. Turn your PC on. 2. Close any applications that are running on your computer.
Tutorials 2. Press until the option Scan to PC appears on the screen. The Pen display will show: The Pen Main Menu 3. Press to activate the Scan to PC application. The Pen display will show: The Scan to PC screen Step 3: Scan a sentence and send it to the PC 1. Scan the first line of the following sentence: Roll the scanning device over printed words and see how the words appear in Notepad. After the sending is carried out, you will see the scanned line in Notepad.
WizCom InfoScan™ 1.00 User Guide Product Specification Pen specification: CPU Memory: SRAM ROM Flash Memory Card Communication Interface Optical Scanner Display Battery Type Weight Dimension Regulations Compliance Operating Temperature ARM 7 ASIC, 16 bit, 80 MHz 128K x 16 bit 2MB 8MB o USB connection (PC side) o IrDA o 128 pixels linear array image sensor o 400 DPI o Dimension: 61 x 20 x 2 (mm) o Resolution: 122 x 32 pixels 2 x 1.
Worldwide Limited Warranty Worldwide Limited Warranty WizCom Technologies Ltd.
WizCom InfoScan™ 1.00 User Guide EXCEPT AS EXPRESSLY SET FORTH IN THIS WARRANTY, WIZCOM MAKES NO OTHER WARRANTIES EXPRESSED OR IMPLIED, AND TO THE FULLEST EXTENT PERMITTED BY LAW, WIZCOM DISCLAIMS ALL OTHER WARRANTIES EXPRESSED OR IMPLIED, INCLUDING BUT NOT LIMITED TO ANY IMPLIED WARRANTIES OF MERCHANTABILITY OR FITNESS FOR A PARTICULAR PURPOSE OR USE.