
Technical data
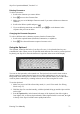
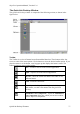

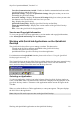
Table Of Contents
- Part 1: Introducing the SuperPen
- How to Use this Manual
- Conventions
- Package Contents
- Registration
- Part 2: Getting Started
- SuperPen Components
- Setting Up the SuperPen
- Basic SuperPen Commands
- Connecting the SuperPen to a Computer
- Using the SuperPen CD-ROM
- Connecting the SuperPen to a PDA or Cellular Phone
- Part 3: The SuperPen CD-ROM
- Part 4: SuperPen Main Menu Options
- Main Menu Overview
- General Main Menu Options
- Part 5: Working with the Quicktionary
- Installing a Dictionary
- Using the Dictionary
- Using the Quicktionary Menu
- Editing Scanned Text in the Quicktionary Application
- Part 6: Scanning Information into the QuickLink Applications
- Using the Notes Application
- Using the Address Book Application
- Using the Internet Links Application
- Using the Tables Application
- Using the Scan to PC Application
- Using the QuickLink Function
- Part 7: Viewing, Editing, and Manually Entering Text in the SuperPen
- Editing Modes
- Entering Text Manually
- Part 8: Using the QuickLink Desktop Application
- Installing the QuickLink Desktop
- Running and Exiting the QuickLink Desktop
- QuickLink Desktop Elements
- Working with QuickLink Applications on the QuickLink Desktop
- Managing Pens on the QuickLink Desktop
- Communicating between the SuperPen and the Computer
- Rearranging SuperPen Applications
- Reallocating Flash Memory
- Part 9: Maintaining and Troubleshooting the SuperPen
- Maintaining
- Troubleshooting
- Contact Us
- Appendix: SuperPen Technical Data
- Glossary
- Index

SuperPen Operation Manual, Version 2.34
Changing Text Size in the QuickLink Desktop
The Text Size option in the View menu enables you to change the text size in the Files and
Current File panes. To change the text size:
1. Select Text Size from the View menu.
2. Click the desired text size, i.e., small, medium, or large.
Note: This option only effects the display in the QuickLink Desktop window.
On-line Help
QuickLink Desktop on-line Help contains complete instructions for using the QuickLink
Desktop application. Search the Help files using the index or table of contents.
You can access on-line Help in the following ways:
Select QuickLink Desktop Help from the Help menu.
Select QuickLink Desktop Help from the QuickLink Desktop Toolbar (see p.77).
Click the Help icon in the system tray (see p. 79).
Context-Sensitive Help
To view context-sensitive Help, Press F1. The on-line Help window opens, displaying
information about the active window. For example, if you press F1 with the Add/Remove
Components window open, the Help window opens and displays information about adding
and removing components.
What is?
The What is? feature provides concise information about specific QuickLink Desktop
options, such as buttons, menu options, or items in a list. To display this information, right-
click the option. A What’s This? callout window opens. Click the window to display an
explanation of the option. Click outside the window to close it.
QuickLink Log
To view a log containing the history of the last three QuickLink sessions, select Log from the
View menu.
The QuickLink Desktop Icon in the System Tray
When the QuickLink Desktop is running, a QuickLink Desktop icon appears in the system tray
on the right side of the Windows taskbar at the bottom of the screen. If, during the QuickLink
Desktop installation, you specify that the QuickLink Desktop should launch on startup, the
icon appears automatically each time you start your computer. Otherwise, it appears only
when you start the QuickLink Desktop manually.
This icon makes it easy to execute the most common QuickLink Desktop commands. When
you click on the icon, a pop-up menu appears. The menu is particularly useful if you are
scanning directly into an application, because it allows you to execute commands without
having the QuickLink Desktop window open. The pop-up menu has the following options:
Show/Hide Window - Displays or hides the QuickLink Desktop window.
QuickLink Desktop Elements
79