
Technical data
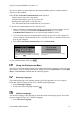
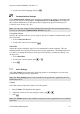
Table Of Contents
- Part 1: Introducing the SuperPen
- How to Use this Manual
- Conventions
- Package Contents
- Registration
- Part 2: Getting Started
- SuperPen Components
- Setting Up the SuperPen
- Basic SuperPen Commands
- Connecting the SuperPen to a Computer
- Using the SuperPen CD-ROM
- Connecting the SuperPen to a PDA or Cellular Phone
- Part 3: The SuperPen CD-ROM
- Part 4: SuperPen Main Menu Options
- Main Menu Overview
- General Main Menu Options
- Part 5: Working with the Quicktionary
- Installing a Dictionary
- Using the Dictionary
- Using the Quicktionary Menu
- Editing Scanned Text in the Quicktionary Application
- Part 6: Scanning Information into the QuickLink Applications
- Using the Notes Application
- Using the Address Book Application
- Using the Internet Links Application
- Using the Tables Application
- Using the Scan to PC Application
- Using the QuickLink Function
- Part 7: Viewing, Editing, and Manually Entering Text in the SuperPen
- Editing Modes
- Entering Text Manually
- Part 8: Using the QuickLink Desktop Application
- Installing the QuickLink Desktop
- Running and Exiting the QuickLink Desktop
- QuickLink Desktop Elements
- Working with QuickLink Applications on the QuickLink Desktop
- Managing Pens on the QuickLink Desktop
- Communicating between the SuperPen and the Computer
- Rearranging SuperPen Applications
- Reallocating Flash Memory
- Part 9: Maintaining and Troubleshooting the SuperPen
- Maintaining
- Troubleshooting
- Contact Us
- Appendix: SuperPen Technical Data
- Glossary
- Index
SuperPen Operation Manual, Version 2.34
Scan in the text you want to translate according to the scanning instructions in Learning to
Scan using the Quicktionary Application, on p. 14. The Quicktionary application processes
the text you have scanned and displays its translation in one of two screens, i.e., the
Translation screen or the Dictionary Entry screen. Both are explained in detail below.
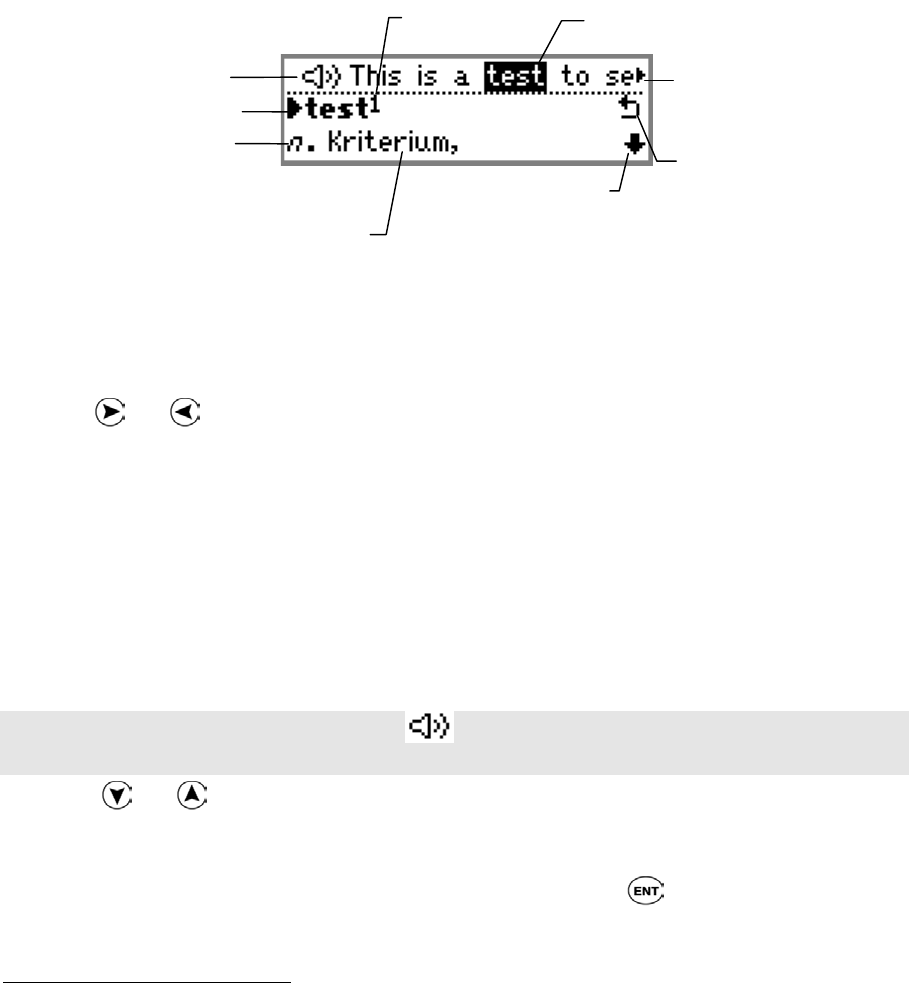
Translation Screen
The Translation screen appears whenever you scan in more than one word at a time. It is split
into two sections. The upper section displays the scanned text. The lower section displays the
dictionary entry corresponding to the selected word in the scanned text above. The
translations start on the next line.
Homonym
Number
Selected word
Headword
Translation
Scroll arrow
indicates additional
translations
Scroll arrow indicates
additional scanned
text
Voice icon
∗
Part of speech
(e.g., noun)
Word List sign
Translation screen
Using the Translation Screen
To use the Translation screen:
1. Press
and to scroll forward and backward through the scanned text. A right scroll
arrow at the end of the text indicates that you can scroll to the right to view the
continuation of the text. When you scroll right, the left scroll arrow indicates that you can
scroll left to view the previous section of the text. The dictionary entry and translation of
each highlighted word appear in the lower screen. If the highlighted word is a derivative
of a dictionary entry, the corresponding dictionary entry appears. If the highlighted word
is the first word in an idiom, the idiom appears.
If Auto Speak
∗
is activated (see the section Quicktionary Menu Options, on p. 36),
Quicktionary pronounces each word as it is highlighted.
When you scan text into the Translation screen the current text is overwritten.
Note: If you scroll left to the Voice icon
∗
, the Quicktionary application pronounces the
entire line of text.
2. Press and to scroll through the translations in the lower section of the screen. The
scroll arrows to the right of the dictionary entry indicate in which direction you can scroll
to view more of the translation.
3. To view the dictionary entry without the scanned text, press
. The Dictionary Entry
screen appears.
∗
Quicktionary Voice products only
Using the Dictionary
30