Quicktionary®2 Premium User Manual
Table of Contents........................ 1 Copyrights and Trademarks...... 46 Worldwide Limited Warranty ..... 46 Registration ...............................
Table of Contents Table of Contents Introduction.....................................................................3 Contact and Support Information .................................3 Getting Started................................................................4 Familiarizing Yourself with the Pen..............................4 The Pen Parts .........................................................4 Setting Up Your Pen ...............................................5 Basic Pen Commands ................
Table of Contents The Toolbar .......................................................... 35 Desktop Window................................................... 36 The WizCom Desktop Taskbar Icon......................... 37 Changing the Desktop Interface Language .......... 38 Pen-PC Communication Settings .............................. 39 Communication Settings....................................... 39 Desktop Modes - Turn Pen Communications Off/On ............................................................
Introduction Introduction Congratulations on your choice of the state of the art ® Quicktionary 2 Premium from WizCom Technologies. WizCom makes personal, portable scanning Pens that assist with reading, understanding and utilizing text. ® Use the Quicktionary 2 Premium to scan full lines of text, receive word-by-word translations, and hear scanned words pronounced aloud. Use the CD provided with the Pen to install one or more of a wide range of dictionaries.
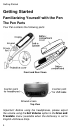
Getting Started Getting Started Familiarizing Yourself with the Pen The Pen Parts Your Pen contains the following parts: Front and Rear Views Top View Important: Before using the headphones, please adjust the volume using the Set Volume option in the Scan and Translate menu (available when the dictionary is set to EnglishChinese Simp.
Getting Started Setting Up Your Pen To get started: 1. Remove your Pen from its protective case. 2. Remove the battery compartment cover from the back of the Pen. 3. Insert 2 AAA batteries into the Pen with the positive and negative terminals corresponding to the markings on the sides of the battery compartment. 4. Close the battery compartment. 5. Remove the protective cover from the Pen tip. 6. Press to turn the Pen on. 7.
Getting Started Scanning Guidelines Scanning Mode The Pen is in scanning mode when the red light at the tip of the Pen is blinking. Scanning mode is disabled when accessing menus. Scanning Direction Text can be scanned from right to left or from left to right. Both will produce the same results.
Getting Started Learning to Scan (using the Trainer) This tutorial uses the Scan and Store application and the plastic scanning Trainer provided with your Pen. 1. Slide the Trainer onto the tip of the Pen (instead of the cap) and press into place. 2. 3. 4. 5. 6. Turn the Pen on. The Pen Main Menu appears. If the Pen Main Menu does not appear, press ESC until it is visible on screen. Scroll to the Scan and Store application using the direction keys and press ENT. Scroll down to New File and press ENT.
Getting Started The Quicktionary®2 Premium CD ® The Quicktionary 2 Premium CD should run automatically when you insert it into the drive on your PC. If the setup does not begin automatically: 1. Click the Windows Start button and select Run. 2. Type x:\setup.exe (where x is your CD-ROM drive), then click OK. ® Use the Quicktionary 2 Premium CD to: Set Up Product on PC: Install the USB driver and WizCom Desktop necessary for transferring data between your Pen and PC. Install additional dictionaries.
Getting Started Note: Please restart your computer if requested to during the installation procedure. Establishing Pen-PC Communications Do the following to check that your Pen and PC are configured correctly for Pen-PC Communications: On the Pen: To set the Pen communications settings: 1. Turn the Pen on, scroll down to Options in the Pen Main Menu and press ENT. 2. Scroll down to Advanced Options and press ENT. 3. Scroll down to Set Serial/IR Comm. and press ENT. 4. Select Cable and press ENT. 5.
Getting Started The correct settings (when using the USB cable) should be as follows: 1. The Port should correspond to the COM port being used by the Pen. To find out whether the port is correct do the following: a. On your computer go to Start/Settings/Control Panel and select System. b. Click on the Hardware tab and then click on the Device Manager. c. Scroll down to Ports (COM & LPT) and open the drop-down list of ports. d.
The Quicktionary®2 Premium The Quicktionary®2 Premium Main Pen Functions You can access all the main Pen functions from the Pen Main Menu which can be seen when turning your Pen on for the first time. Use the direction keys to scroll through the menu options, and ENT to enter an application or access a function or menu. Press ESC to return to the Pen Main Menu from within any of the options.
The Quicktionary®2 Premium Scan and Store Use Scan and Store to scan printed text, such as excerpts from journals and books, into your Pen. Access Scan and Store from the Pen Main Menu. To create a new file, select Create New File from the Scan and Store Menu which opens as soon as you enter the application. Press ESC from the Scan and Store Menu to return to the Pen Main Menu. The scanning screen will appear, with a blinking cursor: Scan text directly into this screen. The text appears highlighted.
The Quicktionary®2 Premium Transferring Files to the PC To transfer stored files to the PC, launch the WizCom Desktop, connect the USB cable to both Pen and PC and select Send Stored Files to PC from the Pen Main Menu. To change the default Send Stored Files to PC settings, see Change File Transfer Settings on page 28. The Scan and Store Menu The Scan and Store Menu contains the following options. Select the option to perform the function described.
The Quicktionary®2 Premium Beam Current File Beam files using infrared communication. Files can be transferred using IrOBEX compatible devices, such as PDAs (Palm, IPAQ etc), or Smartphones. a. Open the note you wish to send and return to the Scan and Store Menu. b. Confirm that the infrared port on the receiving device is enabled to receive. c. Align the infrared screens on both the sending and receiving devices. d. In the Scan and Store Menu scroll down to Beam Current File and press ENT. e.
The Quicktionary®2 Premium The Input Screen This is the screen that appears when you enter the Scan and Translate application. Scan text directly into this screen. The box on the top right shows the currently selected dictionary. After scanning, text is displayed in the Split Screen or the Dictionary Screen. Press ENT from the Input Screen to access the Scan and Translate Menu. The Split Screen The Split Screen appears after scanning more than one word.
The Quicktionary®2 Premium The Dictionary Screen The Dictionary Screen appears after scanning a single word, or after selecting a word from the Split Screen. Scroll through the dictionary entry using or . If the selected dictionary contains support for reading aloud, press ENT to hear the word read aloud. If accessed from the Split Screen, press ESC to return to the Split Screen. The Scan and Translate Menu Press ENT from the Input Screen to access the Scan and Translate Menu.
The Quicktionary®2 Premium Set Scanning Direction This option allows you to choose between horizontal and vertical scanning in dictionaries such as Chinese SimplifiedEnglish. View Translated Words This option displays a chronological list of the most recently displayed words, with the last word you defined at the top. The history list can store up to 80 words. Once the list is full, the oldest word is deleted from the list to make room for the most recent one.
The Quicktionary®2 Premium Word List The Word List sign appears at the top right of the Dictionary Screen and indicates that there are additional entries for the headword on screen. Press ESC to view the Word List. The Word List appears: When the scanned word corresponds to more than one dictionary entry. For example, if you scan the word “dressing”, the Scan and Translate application enables you to choose between the dictionary entries “dress” and “dressing”.
The Quicktionary®2 Premium Phonetics The phonetic transcription of the headword. Parts of Speech Categories of words that describe their particular function, e.g. nouns, verbs, adjectives. Idioms Expressions or phrases usually composed of a sequence of words. They can be identified: Automatically within a sentence By scrolling through the translation of the first word of the sequence.
The Quicktionary®2 Premium Split Verbs If you scan a single word which is part of a split verb: 1. The translation will appear along with the Word List icon. In the Word List, the SPLIT VERB option appears allowing you to scan the first part of the split verb. 2. The message “Scan 1st part” will appear allowing you to scan the first part of the split verb in order to view the translation of the entire verb. If you scan a line of text containing a split verb (e.g.
The Quicktionary®2 Premium To display the dictionary entry for another part of the compound word: Press ENT to go to the Dictionary Screen (if you scanned more than one word). Press ESC to display the word list. Scroll to the word you want to translate and press ENT. For example: If you scan the word ‘Sprachgemeinschaft’, the entry for ‘gemeinschaft’ appears. Go to the word list and select ‘Sprache’ to view its translation.
The Quicktionary®2 Premium Homograph Pronunciation A homograph is one of two or more words that have the same spelling but differ in origin, meaning, and sometimes pronunciation, such as "fair" (pleasing in appearance) and "fair" (market) or "wind" (wĭnd) and "wind" (wînd). If the selected word is a homonym, Scan and Translate will read out all the options for pronouncing the word. Scan to PC Use Scan to PC to scan text and send it directly to the PC.
The Quicktionary®2 Premium Using Scan to PC To use Scan to PC: 1. Launch the WizCom Desktop. 2. Make sure that the Pen is connected to the PC with the USB cable. 3. Ensure that communications are working between your Pen and computer. If you are not sure if your communications are working, run the Communications Wizard from the Help menu on the WizCom Desktop Menu Bar. Note: If you have problems with Pen-PC Communications, see Establishing Pen-PC Communications on page 9. 4.
The Quicktionary®2 Premium Nothing: Nothing is inserted after each scan; the next scanned text will be inserted immediately after the last character of the previous scan. Scanning in Different Languages On the Pen: Use the left/right direction keys to change the scanning language. When the scanning language is set to Chinese, use the up/down direction keys to switch between horizontal and vertical scanning.
The Quicktionary®2 Premium Scanning Training Use the scanning training to learn how to scan correctly with your Pen. Follow the instruction on the Pen. Use the left/right direction keys to move between screens and the ESC key to exit. The scanning language correlates to the interface language currently selected on the Pen. The training provides you with two options 1. Scanning with the training card and plastic scanning Trainer provided with the Pen.
The Quicktionary®2 Premium Send Stored Files to PC Use the Send Stored Files to PC option in the Pen Main Menu to transfer Scan and Store files from your Pen to the PC using the Desktop application To use Send Stored Files to PC, the WizCom Desktop must be running on the PC. The WizCom Desktop does not need to be maximized on screen as long as it is running (the icon appears in the notification area of the Windows taskbar).
The Quicktionary®2 Premium File Transfer Settings in the Desktop Use the File Transfer Settings dialog box to determine what happens to files saved on the Pen when you select Send Stored Files to PC from the Pen Main Menu. If you have several Pens using the same Desktop application, you can define individual settings for each Pen, based on their individual Pen names. To define File Transfer Settings: 1. 2. 3. 4. 5.
The Quicktionary®2 Premium 6. operation (to verify the settings), click on the Show this Dialog before each file transfer checkbox prior to closing the dialog box. When you have finished, close the File Transfer Settings menu by clicking on the Close button. Change File Transfer Settings There are two options available when transferring Scan and Store files to the PC: 1. Pen to PC: The Pen files are copied from the Pen to the computer, overwriting the corresponding files on the computer.
The Quicktionary®2 Premium The Options Menu Modify the default Pen settings using this menu which can be accessed via the Pen Main Menu. To select an option, scroll to the required option using or and press ENT when the option is highlighted. To return to the previous screen without making changes, press ESC. The Options menu contains the following: Set Interface Language Use this option to change the language in which menus and messages appear. Select Interface Language.
The Quicktionary®2 Premium Set Auto Shut-Off Time If the Pen is not in use it will shut down automatically after two minutes. Use this option to change the automatic shut-off time. 1. Select Auto Shut-Off Time. 2. Choose the auto shut-off time you want using or and press ENT. Set Contrast Use this option to adjust the brightness of the display. 1. Select Set Contrast; the adjustment bar appears. 2. Adjust the contrast using or and press ENT. The higher the number, the darker the display.
The Quicktionary®2 Premium Set Serial/IR Comm. Use this option to select the connection device being used for Pen-PC Communications (USB cable or infrared). It is recommended that the USB cable is used when communicating with the computer. 1. Select Set Serial/IR Comm.. 2. Scroll to the required device using or and press ENT. Set Baud Rate The baud rate should always be set to 115,200. 1. Select Set Baud Rate. 2.
The WizCom Desktop The WizCom Desktop The WizCom Desktop is the application your Pen uses to communicate with and transfer data to your PC. It has two main functions: 1. Transferring stored data from the Pen to the PC using the Send Stored Files to PC option on the Pen. 2. Scanning data directly into Windows applications using Scan to PC.
The WizCom Desktop The Desktop User Interface The Desktop is divided into three main sections: 1. Menu Bar: The Menu Bar runs across the top of the screen. It contains all the options for using the Desktop. 2. Toolbar: The Toolbar is an iconic interface containing some of the main Desktop features. 3. Desktop Window: The Desktop Window is where all the files transferred between the Pen and PC can be viewed and edited. The Menu Bar The Menu Bar runs across the top of the screen. It contains four menus.
The WizCom Desktop The Pen Communications Menu The Pen Communications Menu contains the following options: Turn Pen Communications Off/On: Toggle communications on and off. Add/Remove Pen Components: For advanced users only! Should not be accessed unless advised by Support. Optimize Pen File System: Clear empty spaces on your Pen extension card caused by file transfer and deletion. Communications Settings: Define communication settings for Pen-PC communications.
The WizCom Desktop The Help Menu The Help Menu contains the following options: Help: Access the Desktop online help document. Communications Wizard: Run the Communications Wizard to establish communications between your Pen and the PC. Register at WizCom Site: Register your Pen on the WizCom website. About: View the Desktop copyright and version information. The Toolbar The Desktop Toolbar is located beneath the Menu Bar and allows quick access to some of the most-used Desktop functions.
The WizCom Desktop Desktop Window The Desktop Window is split into vertical panes. To resize or hide a pane, drag the split bar between two panes to one side. Applications Pane The left pane is the Applications Pane and displays the icons of all the applications installed on the Pen. Click on the application icon to view the files associated with the application. Files Pane The Files Pane displays the list of files for the application.
The WizCom Desktop The WizCom Desktop Taskbar Icon The Desktop icon is located in the notification area of the Windows taskbar. If you have set the Desktop to launch upon startup, the icon will appear automatically each time you start your computer. If not, the icon will appear only after you launch the Desktop. When the Desktop is open on screen, clicking the icon on the top right of the screen will not exit the application, but will cause it to minimize to the taskbar.
The WizCom Desktop Scan to PC Settings: Define the character to be inserted after each line of text you scan using the Scan to PC Settings dialog box. Log: See the log of the last Pen-PC communication activity. Help: Access this document. About: View the copyright and version information for the Desktop application. Exit: Exit the Desktop application. Changing Language the Desktop Interface The Desktop contains support for both Chinese Simplified and English user interfaces.
The WizCom Desktop Pen-PC Communication Settings There are four ways in which the Pen communicates with the PC via the Desktop application: Send Stored Files to PC (initiated by Pen) Scan to PC (initiated by Pen) Optimize Pen File System (initiated by Desktop) Launching the Add\Remove Pen Components dialog (initiated by the Desktop) When communicating with the PC, the Pen must be connected to the PC using the cable provided with the Pen.
The WizCom Desktop Offline Mode When the computer is offline, communications with the Pen are disabled. The Desktop cannot detect communications from, or initiate communications with the Pen. The Pen Communications menu options are disabled. To disable Pen communications, select Turn Pen Communications Off from the Pen Communications menu on the Menu Bar, or deselect the icon on the Toolbar. The option toggles to Turn Pen Communications On. Select Turn Pen Communications On to re-enable Pen communications.
The WizCom Desktop 1. Turn your Pen on and select Options/Advanced Settings/ Enter Upgrade Mode. 2. Select Optimize Pen File System from the Pen Communications menu on the Menu Bar of the Desktop application. A progress bar appears on the computer that displays the progress of the optimization process. If communications between your Pen and PC fail, an error message appears when you select Optimize Pen File System.
The WizCom Desktop Recover Components Deleted from the Pen If you do access the Add/Remove Pen Components menu and accidentally delete components from the Pen, use the Pen CD to reinstall the lost components. The CD contains a Restore Pen option which will restore any components you may have deleted. Managing Several Pens in the Desktop You can use more than one Pen with the same Desktop application. Each Pen is defined on the Desktop by a unique Pen Name to make it recognizable by the software.
The WizCom Desktop Working with Files in the Desktop To create new files: Click on the Scan and Store icon and click on the Toolbar. Type a name in the New File box and click OK. Add or delete paragraphs by right-clicking in the Current File Pane and selecting the required option from the menu. To edit files: Select the file you want to edit from the Files Pane.
Additional Information Additional Information Batteries Your Pen comes with 2 AAA Alkaline batteries. If the batteries are low, the "Replace Batteries" message appears on the Pen. When the batteries are about to run out, the Pen shuts down automatically. Many issues may occur on the Pen due to low batteries. If you encounter strange behavior, check the battery level in the Information menu and replace batteries if relevant.
Additional Information Product Specification Feature Display Information Keypad Description Resolution: 122 x 32 pixels Size: 61mm x 20mm / 2.4” x .8” Push Buttons Power/ESC/ENT/Up/Down/Left/Righ t) ARM 7 TDMI CPU Memory 192KB RAM 8 MB ROM External memory 4MB, 6MB or 8MB card Communications USB Cable, Infrared IrOBEX Optical Scanner 128 pixels linear array image sensor 400 DPI resolution Power 2 x 1.5V AAA Alkaline batteries Size L x W x H: 163 mm x 38 mm x 23 mm (6.4” x 1.
Copyrights and Trademarks Copyrights and Trademarks © 2008 WizCom Technologies Ltd. All rights reserved. WizCom Technologies Ltd. uses the Ligature OCR-on-aChip copyright © 1995-2008, Ligature Compression Technology copyright © 1996-2008, and Ligature reverse inflection and derivation technology copyright © 1997-2008 under license from Ligature Ltd. All rights reserved.
Worldwide Limited Warranty found to be defective and malfunctioning during normal usage and returned within the warranty period, provided that: (i) The PRODUCT has not been damaged or subjected to mishandling, improper storage, misuse, neglect, abuse, accident, alteration, abnormal operation or conditions, operation in an unsuitable environment or in a manner for which it is not intended, unauthorized repair, unauthorized modifications, or other acts which are not the fault of WizCom.
Worldwide Limited Warranty will be uninterrupted or error free, or that all defects in the PRODUCT will be corrected. EXCEPT AS EXPRESSLY SET FORTH IN THIS WARRANTY, WIZCOM MAKES NO OTHER WARRANTIES EXPRESSED OR IMPLIED, AND TO THE FULLEST EXTENT PERMITTED BY LAW, WIZCOM DISCLAIMS ALL OTHER WARRANTIES EXPRESSED OR IMPLIED, INCLUDING BUT NOT LIMITED TO ANY IMPLIED WARRANTIES OF MERCHANTABILITY OR FITNESS FOR A PARTICULAR PURPOSE OR USE.
Registration Card [_] Sign up for updates Additional information: _______________________________ What is your primary language? ________________________ What product did you purchase?________________________________________ Where did you purchase the product? [_] Computer Store [_] Office supply Store [_] Superstore [_] Duty Free [_] Direct Mail [_] Magazine Advertisement [_] Received as gift [_] Bundled [_] Other _______________________ How did you hear about this product? [_] Advertisement [_] Dealer