
Product Manual
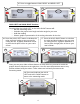

B. Function and Calibration
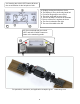
Button functions:
Installing batteries and turning on:
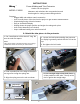
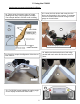
7. Gently tap the spring arms so the 4
points on the bottom of the arms are
fully seated
in the trim
8. Fasten each spring arm to the trim
with user supplied screws. Be sure
they don’t go all the way through.
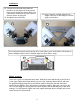
ON/OFF:
- Press to turn on.
- Press and hold to turn off.
HOLD-LEFT:
-Press to hold the
calculated miter and bevel
angle and display the cut
orientation for the left
piece of trim.
BEVEL-CAL:
-Press to toggle between
DUAL
BEVEL and BEVEL LEFT only
-Press and hold to calibrate.
HOLD-RIGHT:
-Press to hold the
calculated miter and bevel
angle and display the cut
orientation for the right
piece of trim.
Press and hold both to remove from
hold and return to measuring mode
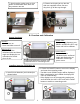
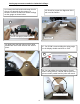
9. Install 2 AAA batteries (not included) as
shown below:
10. Press the ON/OFF button to turn on the display
and enter the measuring mode.
- The WALL and SPRING angles will be displayed
- When new batteries are installed the display will
come on automatically.
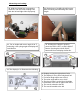
- If the display is not in the measuring mode press
and hold both the HOLD LEFT and HOLD RIGHT
buttons to switch to measuring mode.
2
7
8
9
10