
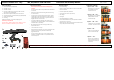
Manual & Replacement parts
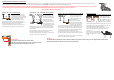

Handling:
Disassembly for transport:
First, remove the pad rest by turning
the locking mechanism (1) clockwise
and then the pad rest (2) by ca. 1/8
turns counterclockwise and lift.
Then remove the shoulder rest arm. To this end unlatch the
small lever (3) and turn the shoulder
rest arm (4) ca. 1/8 turns
counterclockwise and lift the shoulder
rest arm perpendicular to the base.
Transport:
Stow pad rest, shoulder rest arm and hex wrench inside
the cloth bag in your instrument case, preferably
separately from your instrument.
Assembly after transport:
(In reverse order than disassembly.) Place the shoulder
rest arm onto the base and turn it clockwise 1/8 turns.
Then latch it with the lever. Next, put the the complete
pad rest onto the shoulder rest arm, turn it by ca. 1/8
turns clockwise and latch it by the pushing the lever with
your thumb counterclockwise. Please check both locking
mechanisms.
Adjustment:
Height and position of pad rest in relation to the
instrument
With this slide you can limit or unblock the height
adjustability. If you move the slide
away from the pad (to the right in
the picture) you can then position
the shoulder rest arm higher but
no longer lower. Move it in the
direction of the pad and you will
reach the maximum setting range.
So you can rotate the pad sideways and still maintain the
pad height.
Open the screw with the hex wrench only that far so that
you can pivot the shoulder rest arm and move it in the
height. Now choose the new position of the pad and hold
the shoulder rest arm with one hand while tightening the
screw not too firm
This adjustment can only be carried out with a shoulder
rest arm that is mounted and latched onto the
base.vornehmen.
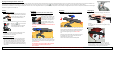
Adjustment:
Turning, tilting the pad rest sideways or lengthwise
Place the hex wrench through the central opening of the
pad into the screw and open the screw by ca. ½ turn. Then
you can manouvre the pad rest in 3 axes. Now choose the
new position of the pad rest and hold the pad rest with
one hand while tightening the screw not too firm.
Tip:
Should you have problems with the hex wrench to locate
the hexagon of the screw, remove the pad, make the
adjustment and re-clip the pad.
You can also attach the pad rest twisted by 180°.
Changing pads:
You can remove the pad by unhinging it from the 4 ball
joints.
Re-mount the pad by successively clipping the 4 ball joints
together.
Tip: You can clean the pad under running water using a
rinsing agents.
Use of the setting template:
Use of the setting template:
With the help of this template you can easily carry out
smaller adjustments on your shoulder rest. Attach this
template as shown, mark or memorise the value of both
points and change the setting of the shoulder rest.
Adjusting
and
handling
the Wittner
shoulder
rest:
When the base is mounted to your instrument you can reinsert the shoulder rest arm with pad. Put the part with the free end into the drilling of the base (1-see pic on the right) and turn the shoulder rest arm by ca. 1/8 turns clockwise. You
should feel some resistance at the end of the turn. Then latch the shoulder rest arm with the lever (2-see pic on the right ) by rotating the lever clockwise. When you hear a „click“ your shoulder rest is safely latched.
The shoulder rest is delivered in a basic setting that already fits most of its users. That is why please make sure if you need to adjust the position of the pad and/or its height above the instrument. The adjustment possibilities and handling are
identical for all types of this shoulder rest.
---
Please
check
after
each
set-up
both
locking
mechanisms,
the
distances
and
the firm fit
of
the
fasteners
on
the
instrument. ---