oCam-1CGN-U-T™ User Manual 2019. 4. WITHROBOT Inc.
oCam-1CGN-U-T User Manual Revision History Rev Date Description Author 1.0 2019. 4 1st Release PD Note This product is for indoor use only. Severe electrostatic stress can damage the product. www.withrobot.
oCam-1CGN-U-T User Manual CONTENTS Revision History 1 1. INTRODUCTION ....................................................................................................................... 3 Features 3 External View 4 Additional Technical Information 5 2. SPECIFICATIONS ...................................................................................................................... 6 Camera Specifications 6 Board Dimensions 7 Case Dimensions 7 3. TRIGGER SIGNAL .........................
oCam-1CGN-U-T User Manual 1. INTRODUCTION Features oCam-1CGN-U-T is a 1 mega pixels global shutter external trigger color camera with the following features. External Trigger: It accepts wide range of external trigger signal from 3V to 24V DC to control precise timing of image acquisition and to be synchronized with external lights and even with other cameras. Interface: USB3.0 SuperSpeed High Speed: Up to 54 fps @1280 x 960, 180 fps @640 x 480 Easy Installation: With UVC 1.
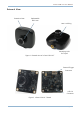
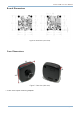
oCam-1CGN-U-T User Manual External View Protective Case Replaceable M12 Lens Lens Lock Ring Mounting Hole for Tripod Figure 1. External view of oCam-1CGN-U-T External Trigger Connector USB 3.0 Connector Figure 2. oCam-1CGN-U-T board www.withrobot.
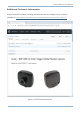
oCam-1CGN-U-T User Manual Additional Technical Information Further technical information including the latest firmware and example source codes are available at “https://github.com/withrobot/oCam/tree/master/Products/oCam-1CGN-U-T”. Figure 3. Technical information site www.withrobot.
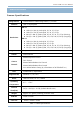
oCam-1CGN-U-T User Manual 2. SPECIFICATIONS Camera Specifications Image Sensor OnSemi AR0135 CMOS Image Sensor, 1/3 inches Interface USB 3.0 SuperSpeed USB 3.0 Resolutions 1280 (H) x 960 (V) pixels @54, 1280 (H) x 720 (V) pixels @60, 640 (H) x 480 (V) pixels @100, 320 (H) x 240 (V) pixels @180, 50, 30, 25, 15 fps 50, 30, 25, 15 fps 90, 60, 50, 30, 25, 15 fps (binning) 150, 120, 100, 60, 50 fps (cropping) USB 2.
oCam-1CGN-U-T User Manual Board Dimensions Figure 4. Board size (Unit: mm) Case Dimensions 49 49 49* Figure 5. Case size (Unit: mm) * 51mm with tripod mounting adapter www.withrobot.
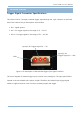
oCam-1CGN-U-T User Manual 3. TRIGGER SIGNAL Trigger Signal Connector Specifications The oCam-1CGN-U-T accepts a external trigger signal through the 3-pin connector on the back side of the camera. The pin descriptions are as follows: Pin 1: Signal ground Pin 2: For trigger signals in the range of 3V ~ 5V DC Pint 3: For trigger signals in the range of 5V ~ 24V DC Input pin for Trigger Signal (3V ~ 5V) Input pin for GND Trigger Signal (5V ~ 24V) Figure 6.
oCam-1CGN-U-T User Manual Figure 7. Trigger input circuit Trigger Signal Specifications The camera acquires image at the falling edge of the trigger signal. Depending on the trigger signal, the camera operates in one of the 3 modes described as follows. One Shot Mode With this mode, the camera acquires one frame of image. The trigger signal should maintain the low level at least 1 msec(T1). Figure 8. One shot mode Multi Shot Mode With this mode, the camera acquires multiple frames of images.
oCam-1CGN-U-T User Manual Figure 9. Multi shot mode Continuous Mode With this mode, the camera acquires images continuously at the interval set as camera speed. For example, in the following figure, the camera starts to acquire the image after the trigger signal goes low and acquires the images at the interval of T3 set as the camera fps. When the trigger signal goes high, the camera stops to acquire the images. Figure 10. Continuous mode www.withrobot.
oCam-1CGN-U-T User Manual 4. HOW TO USE ON WINDOWS SYSTEM Connection to Windows PC Connect the USB cable, either USB 2.0 or USB 3.0, to the USB port of the computer. After the camera is detected, the computer will show a message that the camera is connected. To check if the camera is connected successfully, open the device manager and check if the oCam-1CGN-UT appears correctly as shown below. Figure 11. Connection check (example of Windows 10) www.withrobot.
oCam-1CGN-U-T User Manual Viewing the Camera Image As the oCam-1CGN-U-T sends the image in Bayer RGB format, other than the typical YUV format, you need to use image viewing software that can handle this format, such as the oCamViewer program provided by the WITHROBOT Inc. On starting the oCamViewer, the main window will appear as shown below. Figure 12. Main window of the oCamViewer for Windows Select the resolution and the fps on the dropdown list. Figure 13.
oCam-1CGN-U-T User Manual Click the [Play] button. To change the resolution/fps, click the [Stop] button first and then select one on the dropdown list, and then click the [Play] button. To check or change the camera parameters, click the [Cam Ctrl] button while the camera is being displayed to open the control window. Use the slide bar to change a parameter. Figure 14. Control window of the oCamViewer for Windows To stop viewing the camera image, click the [Stop] button on the main window.
oCam-1CGN-U-T User Manual 4. HOW TO USE ON LINUX SYSTEM Connection to Linux PC Viewing the Camera Image (1) Viewing the Camera Image with the oCamViewer As the oCam-1CGN-U-T sends the image in Bayer RGB format, other than the typical YUV format, you need to use image viewing software that can handle this format, such as the oCamViewer program provided by the WITHROBOT Inc. On starting the oCamViewer, the main window will appear as shown below. Figure 15.
oCam-1CGN-U-T User Manual To change the resolution/fps, select “Format” on the right panel and select one on the dropdown list, and then click the [Apply] button at the bottom. Figure 16. Resolution selection on the oCamViewer www.withrobot.
oCam-1CGN-U-T User Manual To change the camera parameters, select “Controls” on the right panel and use the slide bar to change a parameter. Figure 17. Camera controls of the oCamViewer for Linux www.withrobot.
oCam-1CGN-U-T User Manual (2) Viewing the Camera Image with the Guvcview Start the Guvcview by entering the “guvcview” command on the terminal window. Figure 18. Starting the Guvcview Figure 19. Guvcview image window On the Guvcview camera image window, the current frame rate is shown on the top bar. www.withrobot.
oCam-1CGN-U-T User Manual 5. NOTES On the oCam-1CGN-U-T, you can adjust the focus by rotating the lens by hand. Therefore, in a vibrating environment, the lens can be loosened by being rotated by itself. To prevent this, it is recommended to lock the lens by using the supplied lens lock ring after you finish adjusting the focus. To change the lens, you need to loosen the lock ring first before you take out the lens from the holder. www.withrobot.
oCam-1CGN-U-T User Manual 6. TRIGGER SIGNAL BOARD The oCam-1CGN-U-T can be used with any signal source as long as it meets the input signal specification. It is recommended to use the mTrigger, however, which is a trigger signal board supplied by the WITHROBOT Inc. for full compatibility and verified operation. The mTrigger signal board supports the following 4 signal modes which are all user programmable to set the detailed signal parameters.
oCam-1CGN-U-T User Manual Item Value Range of trigger pulse period(user programmable) Range of interval between trigger pulse(user programmable) Range of trigger signal asynchronous trigger pulse width(user programmable) Range of number of trigger pulses(user programmable) 5 msec ~ 30,000 msec 0 msec ~ 30,000 msec 5 msec ~ 30,000 msec 0 ~ 30,000 Table 3. mTrigger specifications www.withrobot.
oCam-1CGN-U-T User Manual APPENDIX Specifications of the Bundle M12Lens www.withrobot.
oCam-1CGN-U-T User Manual Specifications of the Onboard M12 Lens Holder www.withrobot.
oCam-1CGN-U-T User Manual How to Update the Camera Firmware The latest camera firmware is available at the following site. https://github.com/withrobot/oCam/tree/master/Firmware The firmware update software (UpdateFW.exe) is available at the following site. https://github.com/withrobot/oCam/tree/master/Firmware/Update_FW The instruction to use the UpdateFW.exe is available at the following site. https://github.