
User Guide


490
About MSI Script
Adding a Custom Action to Multiple Sequences
When you copy and paste an action between sequences, an entirely new copy of that
custom action is stored in the installation database. To avoid this duplication and
possible use of extra disk space, you can assign an action to multiple sequences.
1. Select MSI Script.
2. From Installation Modes, select All Custom Actions.
This displays a list of all custom actions in this installation.
3. In the Actions list, double-click the action.
4. Complete the Details and Properties tabs as you would normally.
If the action does not have these tabs, then you cannot add it to multiple
sequences.
5. On the Location tab, clear No Sequence.
This tab provides another way to perform tasks that you normally perform in the
User Interface, Execute Immediate, or Execute Deferred sequences. See Using the
Custom Action Location Tab on page 532.
6. From Sequence, select a sequence.
7. In the list box of actions, select an action and click Add.
The action is added to the sequence, below the action you selected.
If you are in a merge module, the layout of the Location tab is different. See Using
the Custom Action Location Tab for Merge Modules on page 533.
8. Select other sequences and add the action to them.
9. Click OK.
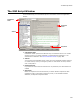
About Installation Sequences
Installation sequences are represented by tabs below the Installation Sequence
section in MSI Script. Windows Installer has 2 main types of sequences: User Interface
and Execute. The User Interface sequence, which is executed at the beginning of
installation, gathers system information, displays dialogs to the end user, and records
end user choices. It is suppressed during silent installations.
The Execute sequence installs the application and makes changes to the system. During
installation, Windows Installer first goes through each action in the Execute sequence
and builds an internal installation script to follow. You cannot see or access this internal
script. This first pass is referred to as immediate mode and is represented by the
Execute Immediate tab. After it creates the internal installation script, it runs the script
it created, performing the actions that change the system. The second pass is referred
to as deferred mode, and encompasses all the actions between InstallInitialize and
InstallFinalize. It is represented by the Execute Deferred tab. This makes it easier to
specify in which mode to run an action. For information on where to place a custom
action, see Guidelines for Custom Action Location on page 499.
When Windows Installer generates the installation script, it generates a rollback script
that will undo the actions of the installation script. The rollback script is executed if the
installation is canceled or is unsuccessful, and is also run in deferred mode. Although
you cannot view or edit the rollback script, you can specify that custom actions you add
be added to it; use the In-Script Options field on the Properties tab of the custom
action details dialog.
On Windows NT, Windows 2000, and Windows XP, Windows Installer runs as a service,
which is registered in the Services control panel. When an .MSI is launched, it is run by